
In this post, we’re going to add a scaling policy to our WordPress auto scaling group.
I read somewhere that all AWS VMs should be launched in an auto scaling group, and at the time that seemed fairly eccentric to me. But after having done my Bastion host template, I agree with that statement wholeheartedly. I don’t recall ever saying I’d like to stand up a server, but if it dies, I want it to stay dead. Generally, you’re standing up a server so it will be available, listening for requests, and sending responses. You don’t know when the request might come, but whenever it comes you want this server to be ready for it.
By itself, an auto scaling group is just a wrapper for one or more VMs that makes them self healing. And who doesn’t like self healing hosts? That said, if you really want high availability, and you expect a load on the servers that is not entirely predictable (and how many servers have an entirely predictable load), then an auto scaling group by itself isn’t enough. You also need to apply a scaling policy to it, so it can provide on demand capacity, which is a central theme in cloud computing. That’s what we’re going to do now.
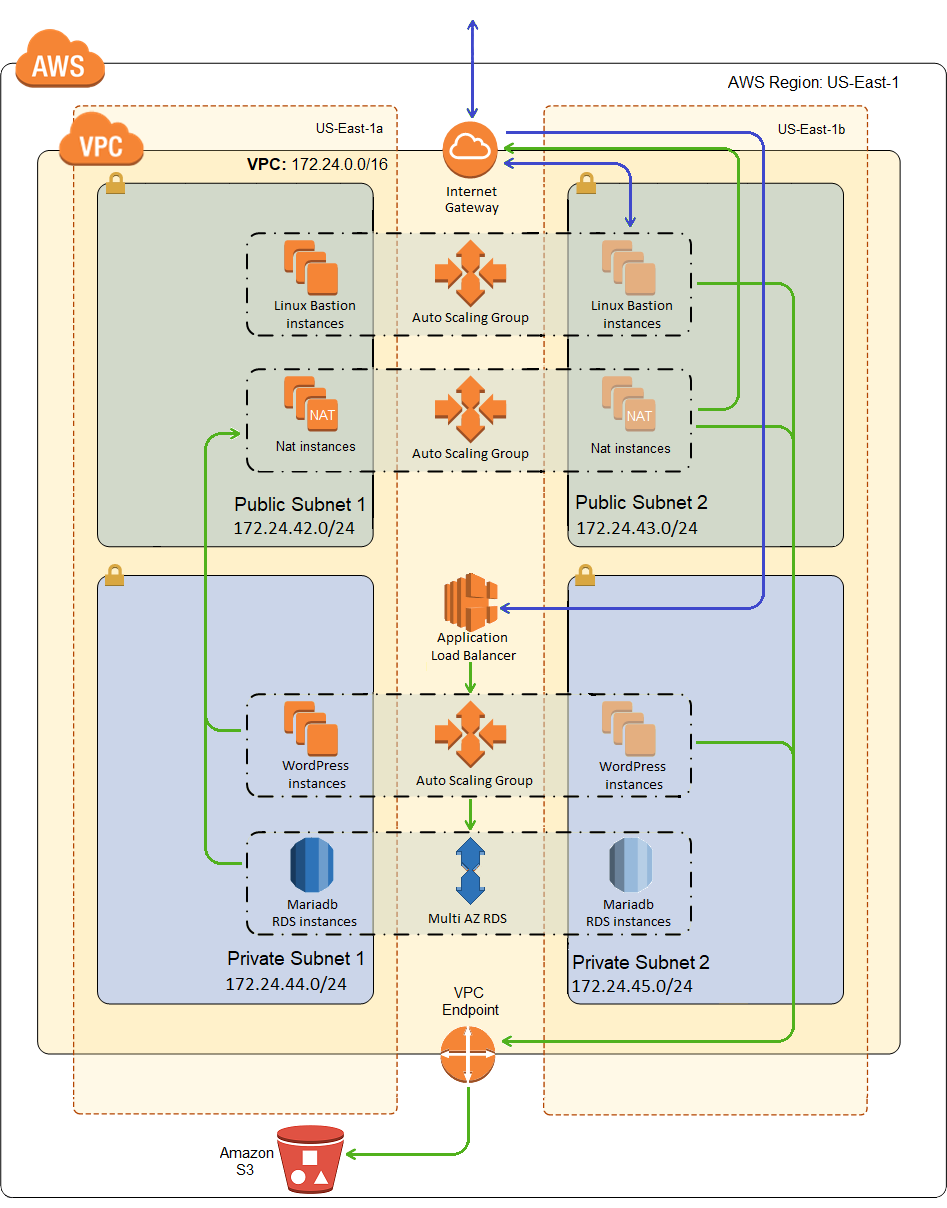
Nothing is actually going to change in my network diagram in this post, but it’s a pretty picture so here it is again:
The Scaling Policy Alarm
The first thing you need for an auto scaling policy is some sort of metric against which you can make scaling decisions, i.e. a CloudWatch alarm, so here’s one of mine:
1 2 3 4 5 6 7 8 9 10 11 12 13 14 15 16 17 18 19 20 21 22 23 24 25 26 | "CpuHigh": { "Type": "AWS::CloudWatch::Alarm", "Properties": { "AlarmDescription": "Scale-up if CPU > 50% for 10 minutes", "MetricName": "CPUUtilization", "Namespace": "AWS/EC2", "Statistic": "Average", "Period": "300", "EvaluationPeriods": "2", "Threshold": "50", "AlarmActions": [ { "Ref": "WordPressScaleUp" } ], "Dimensions": [ { "Name": "AutoScalingGroupName", "Value": { "Ref": "WordPressScalingGroup" } } ], "ComparisonOperator": "GreaterThanThreshold" } } |
The description says scale up, but in truth this alarm has nothing to do with that, it’s only taking the measurement. It just says that the alarm will be triggered when the average CPU of the scaling group (CPUUtilization/Averate) is greater than 50% (ComparisonOperator: GreaterThanThreshold, Threashold: 50) for two consecutive periods (Evaluation Periods: 2) of 5 minutes each (Period: 300 seconds).
It also identifies the virtual hardware (WordPressScalingGroup) that it will be measuring and the action(s) (WordPressScaleUp) that will be taken when this alarm trips. Note that if CloudWatch sees the CPU usage too high for 3 consecutive periods, the alarm will fire twice and the action will be invoked twice, and again for each period until the utilization goes down below the threshold. This does not necessarily mean that a scaling policy action will do anything each time this alarm fires, but it will get called.
The Scaling Policy
And here is the WordPressScaleUp scaling policy:
1 2 3 4 5 6 7 8 9 10 11 | "WordPressScaleUp": { "Type": "AWS::AutoScaling::ScalingPolicy", "Properties": { "AdjustmentType": "ChangeInCapacity", "AutoScalingGroupName": { "Ref": "WordPressScalingGroup" }, "Cooldown": "300", "ScalingAdjustment": "1" } } |
It just says that it will change the capacity of WordPressScalingGroup by adding one instance, and that it will not perform a scaling action more than once every 5 minutes (Cooldown: 300 seconds). The cool down period is one reason why I said above that just because the alarm fires doesn’t mean a scaling action will occur. The alarm will trip and the action will be taken, but the action may not do anything if it is within the cool down period of another scaling operation. Another reason it might not do anything is that if you reach the maximum capacity of your scaling group, the scaling action may fire but it won’t do anything.
So the first time I set this up, I didn’t necessarily think it all the way through. I wanted to see the scaling operation occur fairly quickly, so I set the period to 1 minute, and the number of periods to 1, and the cool down to 1 minute. The thing I didn’t think through was that I didn’t have detailed monitoring turned on, which means CloudWatch is only monitoring once every 5 minutes. The result was that I went from 1 instance to 5 instances in 5 minutes, and I realized it couldn’t have gone any other way, because the 2nd through 5th alarm state checks were using the exact same data as the first check.
The lesson is that it makes no sense to set your period or cool down to less than the frequency of CloudWatch metrics, which is 1 minute for detailed monitoring, otherwise it is 5 minutes.
The Flip Side
And of course, what goes up must come down, unless you forget to put in a scale down policy, so here is mine.
1 2 3 4 5 6 7 8 9 10 11 12 13 14 15 16 17 18 19 20 21 22 23 24 25 26 27 28 29 30 31 32 33 34 35 36 37 | "CpuLow": { "Type": "AWS::CloudWatch::Alarm", "Properties": { "AlarmDescription": "Scale-down if CPU < 25% for 15 minutes", "MetricName": "CPUUtilization", "Namespace": "AWS/EC2", "Statistic": "Average", "Period": "300", "EvaluationPeriods": "3", "Threshold": "25", "AlarmActions": [ { "Ref": "WordPressScaleDown" } ], "Dimensions": [ { "Name": "AutoScalingGroupName", "Value": { "Ref": "WordPressScalingGroup" } } ], "ComparisonOperator": "LessThanThreshold" } }, "WordPressScaleDown": { "Type": "AWS::AutoScaling::ScalingPolicy", "Properties": { "AdjustmentType": "ChangeInCapacity", "AutoScalingGroupName": { "Ref": "WordPressScalingGroup" }, "Cooldown": "300", "ScalingAdjustment": "-1" } } |
I don’t have a great deal to say about this one except to note that to specify a scale down, you give a negative scaling adjustment. I increased the evaluation periods, lowered the threshold, and changed the comparison operator to less than.
Deployment
The deployment is just like the last post, we’re just adding some resources to an existing template, so just upload the template in the zip file below to CloudFormation and fill in the parameters. If you’ve already deployed the cluster/database from the last post, then upload the template as a stack update or change set. Otherwise upload it by creating a new stack. Here’s what I entered for the parameters:
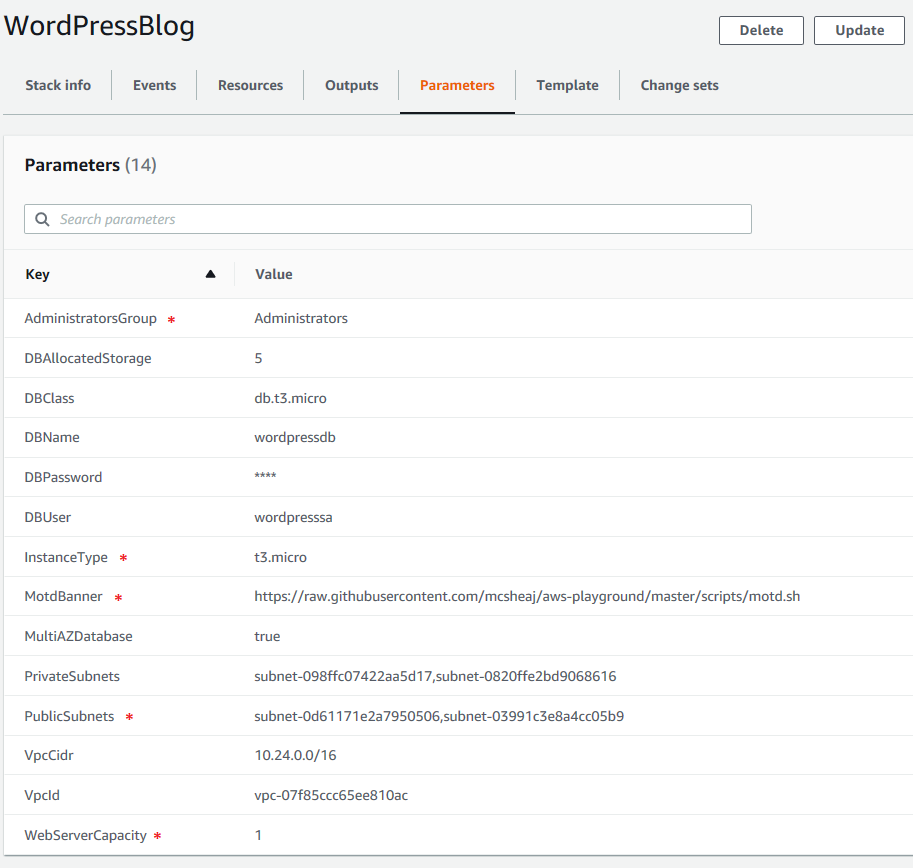
Remember, the parameters marked with a red asterisk were present but were not actually used before, so take care to make sure they’re correct now.
Testing the Scaling Policy
Before testing, if the WordPress scaling group isn’t already configured for a minimum/desired capacity of 1 instance, change it to that now. It’s just easier to test with only 1 instance at start.
First, we need to install some packages on our instance. Run the following command to install the Extra Packages for Enterprise Linux (or EPEL) package:
1 | sudo amazon-linux-extras install epel -y |
Now run the following command to install the stress package:
1 | sudo yum install stress -y |
Now we’re going to run the stress command. Stress just invokes a sqrt() function a bunch of times chewing up CPU in the process. The –cpu option tells stress how many worker processes to spawn, each doing sqrt() repeatedly. It’s intended to stress multiple cores, but even on a 1 core box more worker processes will drive up the CPU utilization quicker. But don’t go crazy here, a few worker processes is more than enough to get our box up to 100% (roughly) CPU utilization quickly enough. So run this command:
1 | stress --cpu 4 |
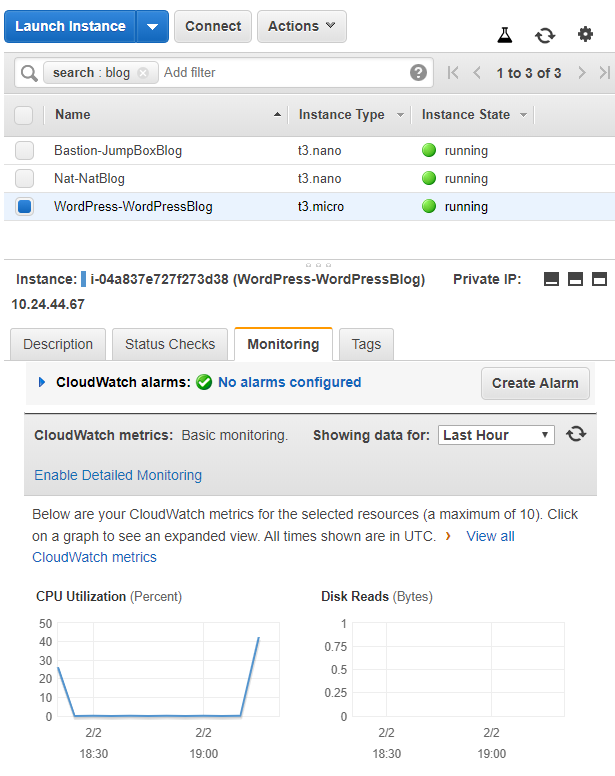
Now wait. In about 1 to 5 minutes, you should see a noticeable spike in CPU activity, like so:
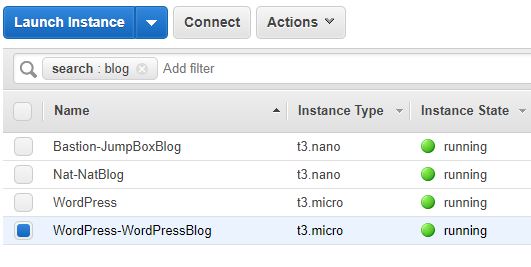
In roughly another 5 minutes you should see another VM spinning up, like so:
Be a little patient here, it will actually take more than 6-10 minutes (2 evaluations/5 minutes each), because scaling operations don’t happen immediately in AWS, they are scheduled (like pretty much every other provisioning operation).
And in another 5 minutes, you should see a third instance start spinning up. Technically, this is borderline. You have one instance running at nearly 100% and another instance running at nearly 0%, the average is right around 50%. But in my limited experience, tie goes to the alarm, so I always seem go to 3 instances. Once there, it should stabilize. My average CPU utilization is now roughly 33% which will neither scale up nor scale down.
If you want to see it go all the way up to 5, log into one of the new VMs, and install stress and run it there too. In 6-10 minutes it will spin up a 4th instance. Again, at 4 instances you have two boxes near 100% and two boxes near 0%, but even if the apparent average is 49.5%, in my experience it will scale up again.
Or you can kill stress on the first machine to see it scale down. It will take roughly 10 to 15 minutes to see the first scale down operation, and then roughly 5 minutes for each additional scale down until it hits the configured minimum number of instances.
Sum Up
This concludes the series on standing up a high availability WordPress site with an auto scaling policy on AWS EC2. I’m currently running just under budget at a little under $400 dollars a year, but that’s also a lie. I’m currently still on the free tier, so I’m not paying for the load balancer. Add that in and I expect to be at least a couple hundred dollars over budget, but my budget was awfully low. Also, for the last 4 months, I’m at 99.99% uptime, according to Pingdom, compared to roughly 99.85% on shared hosting. Page load times are also much better. Currently, Pingdon has me at 0.793 seconds compared to 2.698 seconds on shared hosting. In the interest of full disclosure, I was at about 1.2 seconds when I first moved over, which is still significantly better. I’ve since done some WordPress optimizations that got me down to where I am now.
Note that there are significantly easier ways to do this, like:
- I could have used Elastic Beanstalk to deploy my high availability WordPress site. Looking at the AWS write-up of doing this, it looks like it would have produced a very similar architecture to what I’ve built. It certainly would have been easier. I’m curious as to how it would have fared comparatively with what I’ve done in this series, for cost and performance.
- I also could have used LightSail. It too would have been much easier. Again, curious as to how it compares for both performance and cost.
The reason I went the hard way is that one of my goals was to learn AWS and CloudFormation. At some point in the future, I may try the above easier approaches, compare them performance-wise and by cost, and write blog posts with those results.
There are also several things that I needed/wanted to do to my WordPress farm before going live with it, like:
- I’ve been running my blog on SSL for a while now. I need to figure out how to do that in AWS.
- I need to create backups to an S3 bucket, for both the database and the WordPress installation.
- I need to modify my bootstrap code so it installs WordPress from the most recent backup, instead of reaching out to WordPress and grabbing the latest. I want new VMs to come up serving my content, with my theme and plugins. I don’t want them coming up like a new blank WordPress site.
- I’d also like to explore standing up a VPN as an alternative to my bastion host.
Each of these could, and probably will, be a blog post. And I’ve obviously already done most of them, as evidenced by the fact that you’re reading this blog post and it’s over SSL. I just haven’t gotten around to writing about them yet.
For my next series, I’m going to go and do this all over again, but this time in Azure instead of AWS. It will be interesting to compare that to this for performance, cost and architecture.
WordPressMultiAz.zip – the CloudFormation template.
aws-wordpress-high-availability-blog – the GitHub repository with the complete source for this series.
Reference
- 5 AWS mistakes you should avoid – Michael Wittig