
Ok, let’s do this thing! In this post I’m going to be adding a WordPress Auto Scaling Group spread across two availability zones, and an Application Load balancer to accept connections on port 80 and direct traffic to the Auto Scaling Group. Both will be added to the CloudFormation template I started in my last blog post.
When we’re done, our VPC will look like the following image, which is back to the target image I showed in my first post for the complete solution.
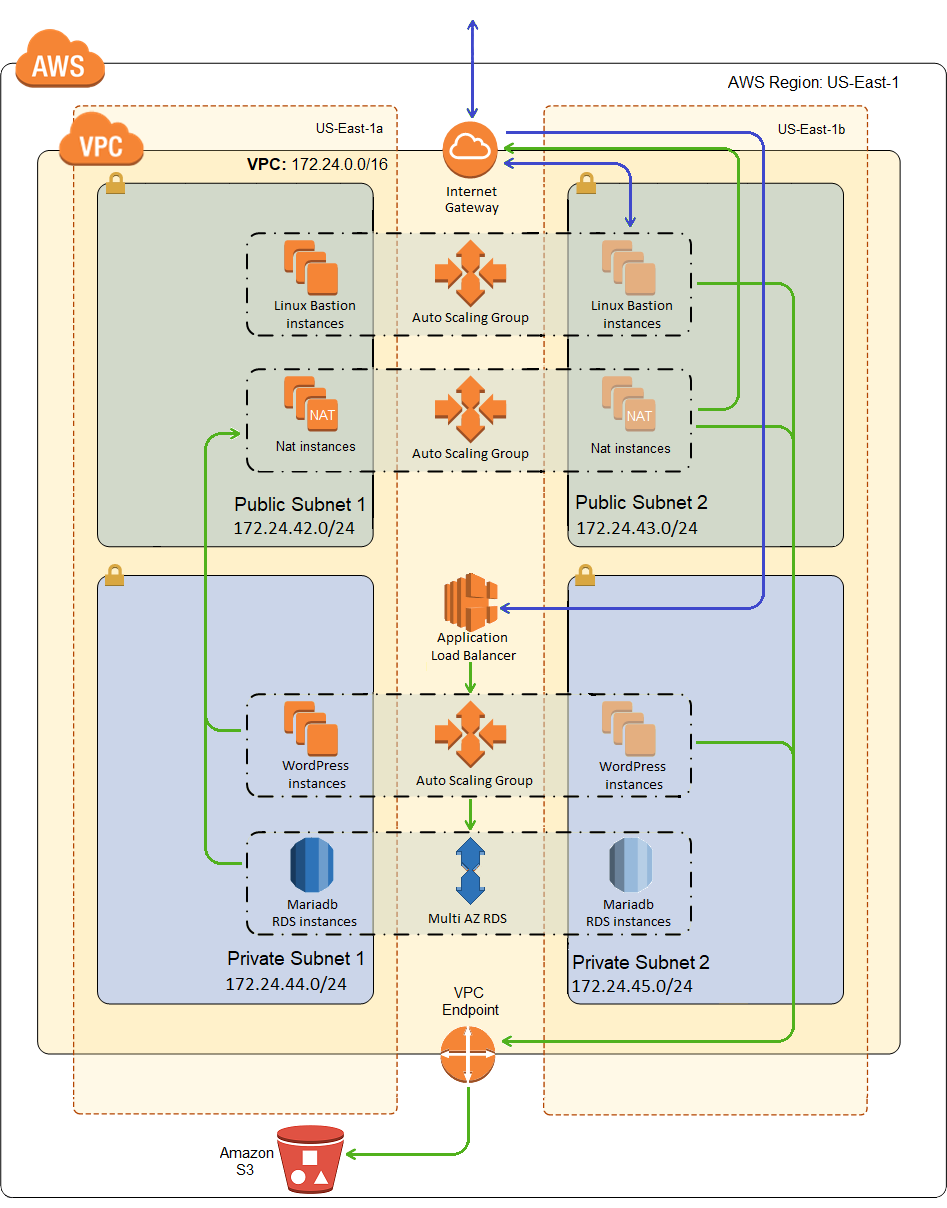
Don’t be fooled, however. While I will have deployed all of the resources shown in the picture, the WordPress cluster won’t actually auto scale until my next post. Even though it’s still called an auto scaling group in AWS, it’s really more of a collection of auto healing instances right now.
The WordPress Scaling Group
The following resources describe a scalable group of Apache web servers running WordPress.
The WordPress Security Group
By now, if you’ve been reading through the series, it’s probably obvious that I generally create a dedicated security group for each addressable resource or group of resources. Trying to reuse security groups across resources that serve different purposes usually leads to bad compromises. If one group needs to allow SSH in and the other needs to allow HTTP, and they’re sharing a security group, the lazy admin will just allow SSH and HTTP to both groups. You can always block unwanted protocols locally with iptables, but defense in depth says you should block it at both levels.
With that said, here is my WordPress security group, which just allows HTTP in from anywhere. It also allows SSH and ICMP, but only from sources within the CIDR range of the VPC.
1 2 3 4 5 6 7 8 9 10 11 12 13 14 15 16 17 18 19 20 21 22 23 24 25 26 27 28 29 30 31 32 33 34 35 36 37 38 39 40 41 42 43 44 45 46 47 48 49 | "WordPressSG": { "Type": "AWS::EC2::SecurityGroup", "Properties": { "GroupDescription": "Enable HTTP access via port 80 locked down to the load balancer + SSH access", "SecurityGroupIngress": [ { "IpProtocol": "tcp", "FromPort": "80", "ToPort": "80", "CidrIp": "0.0.0.0/0" }, { "IpProtocol": "tcp", "FromPort": "22", "ToPort": "22", "CidrIp": { "Ref": "VpcCidr" } }, { "IpProtocol": "icmp", "FromPort": -1, "ToPort": -1, "CidrIp": { "Ref": "VpcCidr" } } ], "VpcId": { "Ref": "VpcId" }, "Tags": [ { "Key": "Name", "Value": "WordPressSG" }, { "Key": "StackName", "Value": { "Fn::Sub": "${AWS::StackName}" } }, { "Key": "Network", "Value": "Private" } ] } } |
The Instance Profile and Role
Here is the profile that I will associate with my WordPress instances in order to be able to convey permissions to the instance without having to do something silly and insecure like storing access keys on the VMs.
1 2 3 4 5 6 7 8 9 10 | "WordPressProfile": { "Type": "AWS::IAM::InstanceProfile", "Properties": { "Roles": [ { "Ref": "WordPressRole" } ] } } |
And permissions are conveyed to the profile through a role, so here is that role:
1 2 3 4 5 6 7 8 9 10 11 12 13 14 15 16 17 18 19 20 21 22 23 24 25 26 27 28 29 30 31 32 33 34 35 36 37 38 39 40 41 42 43 44 45 46 47 48 49 50 51 52 53 54 55 56 57 58 59 60 61 62 63 64 65 66 67 68 69 70 71 72 73 74 75 76 77 78 79 80 81 82 83 84 85 86 87 88 89 90 91 92 93 94 95 96 97 98 99 100 101 102 103 104 105 106 107 108 109 110 111 112 113 | "WordPressRole": { "Type": "AWS::IAM::Role", "Properties": { "AssumeRolePolicyDocument": { "Version": "2012-10-17", "Statement": [ { "Effect": "Allow", "Principal": { "Service": "ec2.amazonaws.com" }, "Action": "sts:AssumeRole" } ] }, "Path": "/", "Policies": [ { "PolicyName": "IP_WordPress_Iam", "PolicyDocument": { "Version": "2012-10-17", "Statement": [ { "Effect": "Allow", "Action": "iam:ListUsers", "Resource": "*" }, { "Effect": "Allow", "Action": [ "iam:ListSSHPublicKeys", "iam:GetSSHPublicKey" ], "Resource": { "Fn::Sub": "arn:aws:iam::${AWS::AccountId}:user/*" } }, { "Effect": "Allow", "Action": "iam:GetGroup", "Resource": { "Fn::Sub": "arn:aws:iam::${AWS::AccountId}:group/${AdministratorsGroup}" } } ] } }, { "PolicyName": "IP_WordPress_S3", "PolicyDocument": { "Version": "2012-10-17", "Statement": [ { "Sid": "ListObjectsInBucket", "Effect": "Allow", "Action": [ "s3:ListBucket" ], "Resource": { "Fn::Sub": "arn:aws:s3:::${BucketName}" }, "Condition": { "StringLike": { "s3:prefix": [ "backup/*" ] } } }, { "Sid": "AllObjectActions", "Effect": "Allow", "Action": "s3:*Object", "Resource": { "Fn::Sub": "arn:aws:s3:::${BucketName}/backup/*" } } ] } }, { "PolicyName": "IP_WordPress_Ec2", "PolicyDocument": { "Version": "2012-10-17", "Statement": [ { "Effect": "Allow", "Action": [ "ec2:DescribeInstances", "ec2:DescribeTags" ], "Resource": "*" }, { "Effect": "Allow", "Action": [ "ec2:CreateTags" ], "Resource": "*", "Condition": { "StringEquals": { "ec2:ResourceTag/StackName": { "Fn::Sub": "${AWS::StackName}" } } } } ] } } ] } } |
All of the permissions granted through this role have been discussed in previous posts.
The WordPress Scaling Group
And below is the scaling group for my WordPress cluster. For the most part, this is just like the scaling groups declared in previous posts in this series, but with a few crucial difference highlighted below.
1 2 3 4 5 6 7 8 9 10 11 12 13 14 15 16 17 18 19 20 21 22 23 24 25 26 27 28 29 30 31 32 33 34 35 36 37 38 39 40 41 42 43 44 45 46 47 48 49 50 51 52 53 54 55 56 57 58 59 60 61 62 63 64 65 66 67 68 | "WordPressScalingGroup": { "Type": "AWS::AutoScaling::AutoScalingGroup", "Properties": { "VPCZoneIdentifier": { "Ref": "PrivateSubnets" }, "LaunchTemplate": { "LaunchTemplateId": { "Ref": "LaunchTemplate" }, "Version": { "Fn::GetAtt": [ "LaunchTemplate", "LatestVersionNumber" ] } }, "HealthCheckType": "ELB", "HealthCheckGracePeriod": "300", "MinSize": "1", "MaxSize": "5", "DesiredCapacity": { "Ref": "WebServerCapacity" }, "TargetGroupARNs": [ { "Ref": "ALBTargetGroup" } ], "Tags": [ { "Key": "Name", "Value": "WordPress", "PropagateAtLaunch": true }, { "Key": "StackName", "Value": { "Fn::Sub": "${AWS::StackName}" }, "PropagateAtLaunch": true }, { "Key": "Network", "Value": "Private", "PropagateAtLaunch": true } ] }, "CreationPolicy": { "ResourceSignal": { "Count": { "Ref": "WebServerCapacity" }, "Timeout": "PT15M" } }, "UpdatePolicy": { "AutoScalingRollingUpdate": { "MinInstancesInService": { "Ref": "WebServerCapacity" }, "MaxBatchSize": "1", "PauseTime": "PT15M", "WaitOnResourceSignals": "true" } } } |
The first difference is that there is no launch configuration to describe the VMs for this group. Instead there is a launch template. Launch templates are a newer resource type with the following advantages over launch configurations:
- Launch templates allow you to specify some newer attributes related to newer machine types. For instance, you can specify unlimited bursting for t2 and t3 instances.
- Also, unlike launch configurations, multiple versions of a launch template can coexist, which is why I have to specify what version of the template I want.
For these reasons, Amazon recommends always using launch templates and maintains launch configurations only for backwards compatability. I haven’t used them until now, becuase all of the sample templates from AWS, and most of the samples found elsewhere, tend to be dated and use only launch configurations. I’m not actually using any of the newer properties at the moment and don’t really care about the versions, but figured it was time I checked them out. I’ll describe differences between launch configurations and launch templates in the next section.
The next highlighted change is that the HealthCheckType is specified as ELB. That means that in addition to the normal status checks performed on all EC2 instances, the scaling group will also take health check advice from the Elastic Load Balancer. Meaning if the load balancer determines through it’s own health checks that the instance is unhealthy, the scaling group will eventually terminate and replace the instance. I’ll also talk more about the load balancer health checks when I get to that section a bit further down the page.
The last highlighted difference is that I specify a target group ARN. Load balancers forward traffic to target groups based on some kind of rules. EC2 VMs and scaling groups can be added to target groups. And of course, I’ll talk more about target groups a bit below.
The Launch Template
And now we get to the launch template. Now it’s a monster as you can see, but no more so than a launch configuration. I’ve just hidden some of it’s girth in previous posts by breaking out some of the bigger sections and explaining them separately (like Metadata and UserData). But we’re past that now, so here’s the whole load of crap in all its glory:
1 2 3 4 5 6 7 8 9 10 11 12 13 14 15 16 17 18 19 20 21 22 23 24 25 26 27 28 29 30 31 32 33 34 35 36 37 38 39 40 41 42 43 44 45 46 47 48 49 50 51 52 53 54 55 56 57 58 59 60 61 62 63 64 65 66 67 68 69 70 71 72 73 74 75 76 77 78 79 80 81 82 83 84 85 86 87 88 89 90 91 92 93 94 95 96 97 98 99 100 101 102 103 104 105 106 107 108 109 110 111 112 113 114 115 116 117 118 119 120 121 122 123 124 125 126 127 128 129 130 131 132 133 134 135 136 137 138 139 140 141 142 143 144 145 146 147 148 149 150 151 152 153 154 155 156 157 158 159 160 161 162 163 164 165 166 167 168 169 170 171 172 173 174 175 176 177 178 179 180 181 182 183 184 185 186 187 188 189 | "LaunchTemplate": { "Type": "AWS::EC2::LaunchTemplate", "Metadata": { "AWS::CloudFormation::Init": { "configSets": { "cfn_install": [ "install_cfn" ] }, "install_cfn": { "files": { "/etc/cfn/cfn-hup.conf": { "content": { "Fn::Join": [ "", [ "[main]\n", "stack=", { "Ref": "AWS::StackId" }, "\n", "region=", { "Ref": "AWS::Region" }, "\n" ] ] }, "mode": "000400", "owner": "root", "group": "root" }, "/etc/cfn/hooks.d/cfn-auto-reloader.conf": { "content": { "Fn::Join": [ "", [ "[cfn-auto-reloader-hook]\n", "triggers=post.update\n", "path=Resources.LaunchConfig.Metadata.AWS::CloudFormation::Init\n", "action=/sbin/aws-update-wordpress.sh\n" ] ] }, "mode": "000400", "owner": "root", "group": "root" }, "/sbin/aws-update-wordpress.sh": { "content": { "Fn::Join": [ "", [ "#!/bin/bash -xe\n", "\n", "echo $1\n", "\n", "# Update this script before updating the stack to perform custom logic within 15 minutes of the update\n", "yum -y update\n" ] ] }, "mode": "000700", "owner": "root", "group": "root" } }, "commands": { "aws_update_bastion": { "command": "/sbin/aws-update-wordpress.sh MetadataVersion=1" } }, "services": { "sysvinit": { "cfn-hup": { "enabled": "true", "ensureRunning": "true", "files": [ "/etc/cfn/cfn-hup.conf", "/etc/cfn/hooks.d/cfn-auto-reloader.conf", "/sbin/aws-update-wordpress.sh" ] } } } } } }, "Properties": { "LaunchTemplateName": { "Fn::Sub": "LaunchTemplate_${AWS::StackName}" }, "LaunchTemplateData": { "ImageId": { "Fn::FindInMap": [ "Region2ArchitectureAmi", { "Ref": "AWS::Region" }, { "Fn::FindInMap": [ "InstanceType2Architecture", { "Ref": "InstanceType" }, "Arch" ] } ] }, "InstanceType": { "Ref": "InstanceType" }, "Monitoring": { "Enabled": false }, "IamInstanceProfile": { "Name": { "Ref": "WordPressProfile" } }, "SecurityGroupIds": [ { "Ref": "WordPressSG" } ], "UserData": { "Fn::Base64": { "Fn::Join": [ "", [ "#!/bin/bash -xe\n", "set +o history", "\n", "echo UserDataVersion=1", "\n", "# Create bootstrap properties in the root account home\n", "mkdir -p /root/.aws\n", "chmod 700 /root/.aws\n", "cat << EOF > /root/.aws/bootstrap.properties\n", "ADMIN_GROUP=", { "Ref": "AdministratorsGroup" }, "\n", "MOTD_BANNER=", { "Ref": "MotdBanner" }, "\n", "DB_USER=", { "Ref": "DBUser" }, "\n", "DB_PASSWORD=", { "Ref": "DBPassword" }, "\n", "DB_DATABASE=", { "Ref": "DBName" }, "\n", "DB_SERVER=", { "Fn::GetAtt": [ "DBInstance", "Endpoint.Address" ] }, "\n", "EOF\n", "chmod 600 /root/.aws/bootstrap.properties\n", "\n", "wget --no-cache -O /tmp/bootstrap-wordpress.sh https://raw.githubusercontent.com/mcsheaj/wordpress-high-availability-blog/master/scripts/bootstrap-wordpress.sh \n", "chmod 700 /tmp/bootstrap-wordpress.sh\n", "/tmp/bootstrap-wordpress.sh", "\n" ] ] } } } } } |
Now the Metadata and UserData are structurally the same as from the launch configuration, so I’m going to concentrate on the highlighted bits, which are the key differences for a launch template. Obviously, the first change is that the type is different. The next change is that there are only two properties for the launch configuration: LaunchTemplateName and LaunchTemplateData.
So where did all of the other properties of a launch configuration get to? Surely you can configure all of the same stuff plus more in a launch configuration? Of course, but those properties are nested one level deeper. For instance, instead of Properties.ImageId, now we have Properties.LaunchTemplateData.ImageId. And finally, some of the property values have structurally changed, and since there aren’t a ton of sample templates using launch configurations, it can be difficult to figure out the differences at first. I’ve highlighted those properties, which are:
- Monitoring – used to be just a boolean. Now it’s an object with a property called Enabled, with a boolean value. Why? I haven’t looked into it, but perhaps there are other properties you can set on that object? Or maybe there will be in the future? Don’t know for sure, but that’s the only thing that makes sense to me.
- IamInstanceProfile – used to be just a reference to the instance profile. Now it’s an object with a property called Name and a value of a reference to the instance profile. Not going to try to explain it, see above for best guess.
- SecurityGroupIds – used to be just SecurityGroups with a value of security group references. Now it’s either SecurityGroupIds or SecurityGroupNames. For non-default security groups, you must specify SecurityGroupIds, and for default security groups you can use SecurityGroupNames. The Ref function returns the id for non-default security groups and the name for default security groups, so that helps a little, but this seems like an unnecessary and idiotic level of added complexity. And you can’t specify both properties, so I guess a single launch template can’t be in both default and non-default security groups? Actually, maybe you can reference a default security group and call FN:GetAtt to get it’s id, which would allow you to use SecurityGroupIds for both (haven’t actually tried this). I don’t tend to use default security groups anyway, so I’ll just stick with SecurityGroupIds. And thanks a bunch for this one Amazon!
And lastly, here is the UserData, in a better format than embedded in JSON:
1 2 3 4 5 6 7 8 9 10 11 12 13 14 15 16 17 18 19 20 21 22 23 24 25 | #!/bin/bash -xe # Turn off bash history set +o history # Create ~/.aws for the root account and lock it down to root access mkdir -p /root/.aws chmod 700 /root/.aws # Create bootstrap properties in the root account ~/.aws directory and lock it down cat << EOF > /root/.aws/bootstrap.properties ADMIN_GROUP={ Ref: AdministratorsGroup } MOTD_BANNER={ Ref: MotdBanner } DB_USER={ Ref: DBUser } DB_PASSWORD={ Ref: DBPassword } DB_DATABASE={ Ref: DBName } DB_SERVER={ Fn::GetAtt: [ DBInstance, Endpoint.Address ] } EOF chmod 600 /root/.aws/bootstrap.properties # Now download our bootstrap script and execute it wget --no-cache -O /tmp/bootstrap-wordpress.sh https://raw.githubusercontent.com/mcsheaj/wordpress-high-availability-blog/master/scripts/bootstrap-wordpress.sh chmod 700 /tmp/bootstrap-wordpress.sh /tmp/bootstrap-wordpress.sh |
What I’m doing here is, before I call my bootstrap script, I’m writing a bunch of my stack parameters out to /root/.aws/bootstrap.properties, which I lock down at both folder and file such that only root can see it. I also turn off bash history at the beginning of the script, because I don’t want my password showing up in my command line history. I’m going to need this information in order to configure things like my wp-config.php file, which tells WordPress how to connect to the database.
The WordPress Bootstrap Script
And finally there’s the bootstrap script, which does all the normal stuff my bootstrap scripts from previous posts did like creating admin accounts and installing/configuring IP tables. The WordPress specific stuff is:
1 2 3 4 5 6 7 8 9 10 11 12 13 14 15 16 17 18 19 20 21 22 23 24 25 26 27 28 29 30 31 32 33 34 35 36 37 38 39 40 41 42 43 44 45 46 47 48 49 50 51 52 53 54 | ################################################################################ # BEGIN WordPress Setup ################################################################################ # TBD AWS Secrets Manager? DB_USER=$(awk -F "=" '/DB_USER/ {print $2}' /root/.aws/bootstrap.properties) DB_PASSWORD=$(awk -F "=" '/DB_PASSWORD/ {print $2}' /root/.aws/bootstrap.properties) DB_NAME=$(awk -F "=" '/DB_DATABASE/ {print $2}' /root/.aws/bootstrap.properties) DB_HOST=$(awk -F "=" '/DB_SERVER/ {print $2}' /root/.aws/bootstrap.properties) # Get the latest LAMP packages for AWS Linux 2 amazon-linux-extras install -y lamp-mariadb10.2-php7.2 php7.2 # Install apache yum install -y httpd # Install php-xml yum install -y php-xml.* # Remove this later echo "<?php phpinfo() ?>" > /var/www/html/info.php # Download wordpress and install it in /var/www/html cd /tmp wget -O /tmp/latest.tar.gz http://wordpress.org/latest.tar.gz tar -xzf /tmp/latest.tar.gz rm -rf /var/www/html/wp-* mv /tmp/wordpress/* /var/www/html chown -R apache:apache /var/www/html chmod 775 /var/www/html cd /var/www/html # Configure wordpress mv wp-config-sample.php wp-config.php sed -i "s/define( *'DB_USER', '.*' *);/define( 'DB_USER', '${DB_USER}' );/" wp-config.php sed -i "s/define( *'DB_PASSWORD', '.*' *);/define( 'DB_PASSWORD', '${DB_PASSWORD}' );/" wp-config.php sed -i "s/define( *'DB_NAME', '.*' *);/define( 'DB_NAME', '${DB_NAME}' );/" wp-config.php sed -i "s/define( *'DB_HOST', '.*' *);/define( 'DB_HOST', '${DB_HOST}' );/" wp-config.php # Generate Auth keys and salts SALT=$(curl -s -L https://api.wordpress.org/secret-key/1.1/salt/) STRING='put your unique phrase here' printf '%s\n' "g/$STRING/d" a "$SALT" . w | ed -s wp-config.php # Lock down wp-config.php chmod 660 wp-config.php # Start the httpd service and configure it to start on boot systemctl enable httpd systemctl start httpd ################################################################################ # END WordPress Setup ################################################################################ |
The comments kind of tell the story, but the highlights are:
- Install Apache and PHP packages.
- Download and install WordPress in the web server root folder.
- Configure WordPress.
- Enable systemd to start Apache on boot, and start Apache now.
There is one other change I made for this script that isn’t WordPress specific, but was necessary because of the switch from a launch configuration to a launch template. It’s at the bottom of the script where I call cfn-init and cfn-signal:
1 2 3 4 5 6 | # Call cfn-init, which reads the launch configration metadata and uses it to # configure and runs cfn-hup as a service, so we can get a script run on updates to the metadata /opt/aws/bin/cfn-init -v --stack ${STACK_NAME} --resource LaunchTemplate --configsets cfn_install --region ${REGION} # Send a signal indicating we're done /opt/aws/bin/cfn-signal -e $? --stack ${STACK_NAME} --resource WordPressScalingGroup --region ${REGION} || true |
In previous posts I’ve called both cfn-init and cfn-signal with the resource specified as the launch configuration. So I tried doing the same for launch template, but got an error calling cfn-signal (something about an illegal resource type). I had to change the cfn-signal resource to the scaling group. The metadata for cfn-init is still in the launch template, so specifying the launch template for cfn-init worked just fine.
The Load Balancer
Now that we have a WordPress scaling group, we need a traffic cop to balance the load between WordPress instances (i.e. a load balancer).
The Security Group
We start with our load balancer security group, which just allows inbound port 80.
1 2 3 4 5 6 7 8 9 10 11 12 13 14 15 16 17 18 19 20 21 22 23 24 25 26 27 28 29 30 31 32 33 | "AlbWordPressSG": { "Type": "AWS::EC2::SecurityGroup", "Properties": { "GroupDescription": "Open load balancer for web traffic", "SecurityGroupIngress": [ { "IpProtocol": "tcp", "FromPort": "80", "ToPort": "80", "CidrIp": "0.0.0.0/0" } ], "VpcId": { "Ref": "VpcId" }, "Tags": [ { "Key": "Name", "Value": "AlbWordPressSG" }, { "Key": "StackName", "Value": { "Fn::Sub": "${AWS::StackName}" } }, { "Key": "Network", "Value": "Public" } ] } } |
The Application Load Balancer
The load balancer declaration just specifies what subnets it will run on and what security group it will be in.
1 2 3 4 5 6 7 8 9 10 11 12 13 | "ApplicationLoadBalancer": { "Type": "AWS::ElasticLoadBalancingV2::LoadBalancer", "Properties": { "Subnets": { "Ref": "PublicSubnets" }, "SecurityGroups": [ { "Ref": "AlbWordPressSG" } ] } } |
The Target Group
The target group is where the action is:
1 2 3 4 5 6 7 8 9 10 11 12 13 14 15 16 17 18 19 20 21 22 23 24 25 26 27 28 29 30 31 32 33 34 35 36 37 38 39 40 41 42 43 44 45 46 47 48 49 50 | "ALBTargetGroup": { "Type": "AWS::ElasticLoadBalancingV2::TargetGroup", "Properties": { "HealthCheckPath": "/info.php", "HealthCheckIntervalSeconds": 6, "HealthCheckTimeoutSeconds": 5, "HealthCheckPort": "80", "HealthCheckProtocol": "HTTP", "Matcher": { "HttpCode": "200" }, "UnhealthyThresholdCount": 4, "HealthyThresholdCount": 2, "Port": 80, "Protocol": "HTTP", "VpcId": { "Ref": "VpcId" }, "TargetGroupAttributes": [ { "Key": "stickiness.enabled", "Value": "true" }, { "Key": "stickiness.type", "Value": "lb_cookie" }, { "Key": "stickiness.lb_cookie.duration_seconds", "Value": "900" } ], "Tags": [ { "Key": "Name", "Value": "WordPress-HTTP" }, { "Key": "StackName", "Value": { "Fn::Sub": "${AWS::StackName}" } }, { "Key": "Network", "Value": "Private" } ] } } |
The target group health check serves two purposes. First, if an instance comes up as unhealthy, the load balancer will stop directing traffic to it. But also, if the scaling group specifies ELB as it’s health check type, then the load balancer will report unhealthy instances back to the scaling group, which will eventually terminate and replace those instances if they don’t right themselves in a reasonable period of time. You specify:
- A server relative path.
- An interval for how often to check.
- How long to wait before a timeout.
- A protocol, port, and expected HTTP response code.
- A count of bad checks before marking an instance as unhealthy.
- A count of good checks before marking an instance as healthy again.
There are a couple of things I don’t love about this health check, starting with the fact that you can only specify a server relative path for the health check. This means if you configure Apache for VHosts, you can only test the default VHost. You also can’t specify multiple health checks, which also isn’t great for VHost configurations.
To get around that, you’d need to write a custom health check. This could be a shell script running as a CRON job that uses the CLI to report healthy/unhealthy based on whatever criteria you like. Or it could be a Lambda function doing much the same with the API. But without some custom code, you can only check the default VHost.
The other interesting bit here is the TargetGroupAttributes. Here I’ve configured stickiness, which means a given client will continue getting connected to the same instance until some period of inactivity has passed. This can lead to something of an unbalanced load, since some clients may hit the backend harder than others. And it is not strictly speaking necessary, since WordPress stores session state in the database.
The Listener
And last but not least, you need a listener, which just ties together a load balancer and target group based on a protocol and port.
1 2 3 4 5 6 7 8 9 10 11 12 13 14 15 16 17 18 | "ALBListener": { "Type": "AWS::ElasticLoadBalancingV2::Listener", "Properties": { "DefaultActions": [ { "Type": "forward", "TargetGroupArn": { "Ref": "ALBTargetGroup" } } ], "LoadBalancerArn": { "Ref": "ApplicationLoadBalancer" }, "Port": "80", "Protocol": "HTTP" } } |
And since it is based on a protocol and port, if you want to handle both HTTP and HTTPS, you need two listeners. And since the target group health check is also based on a protocol and port, you’ll also need two of these for that scenario, but both of them can contain the same scaling group as their backend.
I find it interesting that you specify DefaultActions, but I don’t see a way to specify any other actions? So shouldn’t this just be called Actions?
Now the listener works just fine for VHosts, because the original host name you asked for is passed through in the host header by default. Also, if you install mulitple certificates on the load balancer, it will look for the best certificate to use based on the requested host name and SNI (Server Name Indication), so VHosts work fine for SSL too.
So it’s just the health check that doesn’t have good built-in VHost support.
Deploying the Cluster/Load Balancer
The deployment is just like the last post, so just upload the template in the zip file below to CloudFormation and fill in the parameters. If you’ve already deployed the database from the last post, then upload the template as a stack update or change set. Otherwise upload it by creating a new stack. Here’s what I entered for the parameters:
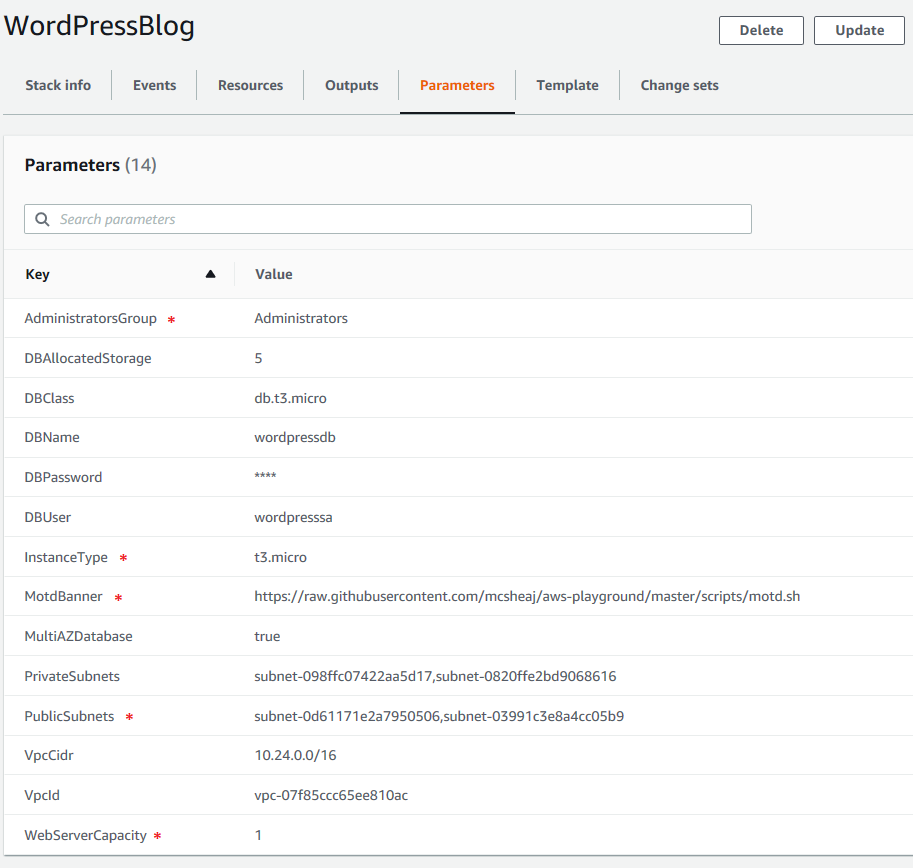
Remember, the parameters marked with a red asterisk were present but were not actually used before, so take care to make sure they’re correct now.
The AdministratorsGroup parameter is an IAM group from which aws-ec2-ssh.sh will attempt to make administrator accounts. If you don’t have a motd banner ready, just leave that alone and use mine for now. Unless you expect 10s of thousands of users per month, db.t3.micro is probably fine for now. But if you really want high availability, MutiAzDatabase should be true and WebServerCapacity should be at least 2 (of course, both of those will drive up the cost).
The reason the web server needs to have a capacity of more than 1 is because from time to time your web servers will wig out and report unhealthy. In my current setup, it’s unusual for a web server to run more than a week. That’s partially because my health check is sort of a hairpin trigger, but also maybe due to not following some Linux best practices. For instance, I only have one partition. /var should ideally be in a separate partition at a bare minimum, so right now log files may be filling up my hard drive. I haven’t really investigated the cause of this yet. But if I only had one web server instance, on every termination for a health check failure, I would be down at least until the new server got through it’s UserData script, which is 3 to 5 minutes on a good day. With two instances, most of my outages are less than a minute, just long enough for the load balancer to notice and redirect all traffic to the healthy host during the boot sequence.
As before, the DBUser and DBPassword parameters are for the database administrator. The DBName is the name of the database to which WordPress will be deployed. I’ve set the DBClass to db.t3.micro; this is the equivalent to Instance Type for the VMs and I’ve selected the smallest t3 size I could. I’ve also entered 5 for the DBAllocated storage which is 5 GB, the smallest hard drive you can allocate. I’ve also entered true for MultiAZ (but choose false if you want to save a little money), and selected the VPC I deployed in the first post in this series, and the two private subnets from that VPC. Click create stack and smoke em’ if you’ve got em’, because this is a pretty slow deployment (how long depends on if you’ve already installed the database or your installing the entire template from scratch, for me it took about 5 minutes with the database already deployed, so from scratch should be like 20 minutes).
Testing the WordPress Installation
Testing this one is pretty easy. All you need is a browser. In the AWS console, go to EC2 and click on Load Balancer in the left hand menu:
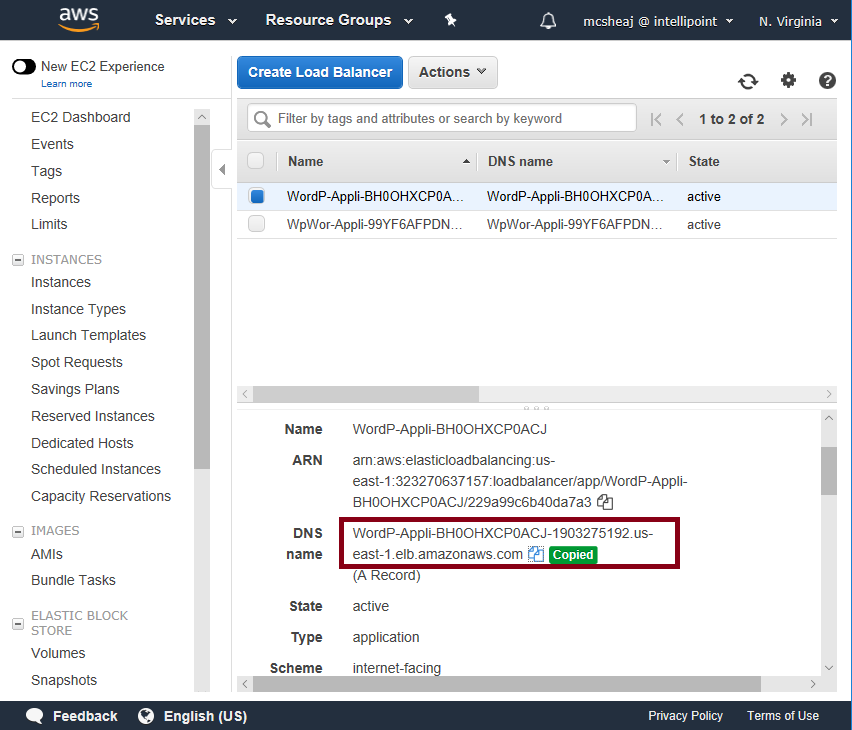
Find the load balancer you just deployed (if you have multiple load balancers and it’s not easy to tell, look at the Created At field). Click the check box to the right of it and copy the DNS Name, then put that in your browser:
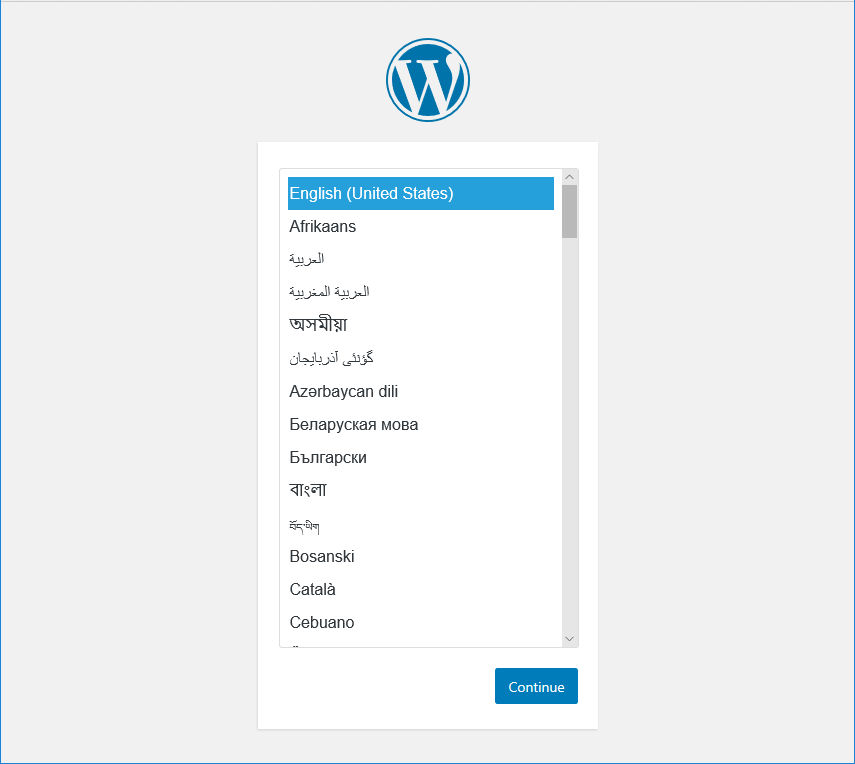
If you see the WordPress setup screen, we have lift off!
Sum Up
Ok…alright…beers all around, we’re done, right? Once again, not so fast sparky! We have WordPress up, and that’s great. We have a MultiAz MariaDB instance. And we’ve got a couple of Apache front ends. If one of them goes down, AWS will bring it back up again. All good stuff. But if 10,000 people hit our site in short order, the only way we’re scaling up is if we log into the console and raise the minimums on our scaling group. To achieve high availability, we need to add an auto scaling policy.
Fortunately, that’s not a lot of work. It will probably take more time to show you how to test it than to implement the scaling policy and explain it to you. It’s going to be a simple, but effective scaling policy, based on CPU load. But this post is quite long enough (my print preview says 27 pages, talk about TLDR; ow), so I’ll do that in the next post.
WordPressMultiAz-1.zip – the CloudFormation template.