In this post we’re going to modify our existing VPC CloudFormation template and add a VPC Endpoint for S3 to it. I’ll also walk you through a reasonable process to update an existing CloudFormation template.
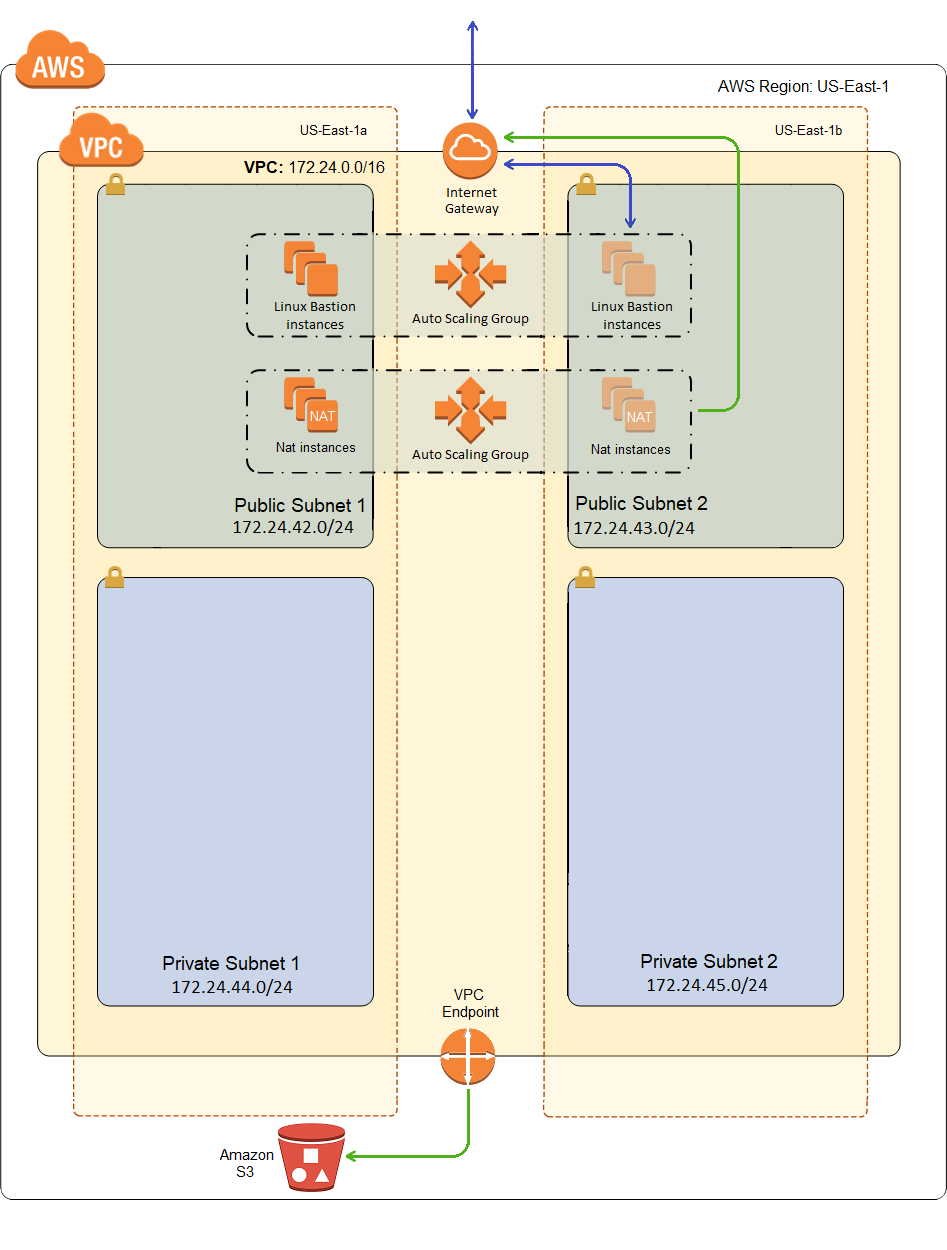
Here is what our VPC will look like after deployment:
Why do I Need a VPC Endpoint for S3
For starters, it saves you money and should improve performance when getting or saving items to S3. Without it, your only way to access an S3 bucket is through the public address and across the Internet. Data transfer is regional when working with S3 through a VPC Endpoint, which is cheaper than across the Internet, and it can add up. That’s a pretty good reason all by itself, but I had another reason.
When I first started spinning up my WordPress instances, CloudFormation would hang for about 15 minutes at provisioning the launch configuration. Then it would roll back with an error saying no signal was received from the instances. It was pretty annoying, because I had such a limited time frame to investigate before it started rolling back.
I had to wait until the box was up enough that my account was created, and then I had about 12 minutes to look around before it started tearing down the stack. I had to remove the creation and update policies from my auto scaling group, which makes it such that CloudFormation doesn’t wait for a signal.
Deploy again and SSH into the WordPress box to start examining the log files. What I found was that my bootstrap was crapping out, because cfn-init was crapping out. Specifically, cfn-init was throwing an exception because it was failing to do a yum update.
Hmmm! The only yum repository configured by default on AWS Linux 2 is an Amazon repository, which is really an S3 bucket. But my script was calling yum update before it called cfn-init. And that update worked fine through my NAT, and across the Internet, to the public address for S3. So why was this cfn-init yum update failing? I haven’t dug into it, but the result was my bootstrap script was exiting with an error before it got to call cfn-signal. Someday I’ll have to look at the Python and see what’s different about their yum update call. Maybe it’s hard coded to use an internal address for an S3 repository, which would only work if you’ve setup a VPC Endpoint?
But since setting up a VPC Endpoint for S3 is a good idea anyway, I went ahead and created one (through the console, I hadn’t looked into how to do it with CloudFormation yet). Anyway, once that was stood up, cfn-init started working correctly. I added back the creation and update policies to my auto scaling group and everything worked as expected.
Turns out that creating it with CloudFormation was quite easy, so let’s get into it now.
The VPC Endpoint Template Resource
I had already provisioned my VPC, so at first I thought it might be easier to create a small separate template to provision just the VPC Endpoint. But the VPC Endpoint needs a list of route table ids. I could pass them in as a parameter of course, but I decided it would be easier to just add it to the VPC template where it seems to belong anyway. I only needed to add a single resource to the template, and here it is:
1 2 3 4 5 6 7 8 9 10 11 12 13 14 15 16 17 18 19 20 21 22 23 24 25 26 27 28 29 30 31 32 33 34 35 36 37 38 39 40 41 42 | "S3Endpoint": { "Type": "AWS::EC2::VPCEndpoint", "Properties": { "PolicyDocument": { "Version": "2012-10-17", "Statement": [{ "Effect": "Allow", "Principal": "*", "Action": "*", "Resource": "*" }] }, "RouteTableIds": [{ "Ref": "RouteTableAPublic" }, { "Ref": "RouteTableAPrivate" }, { "Ref": "RouteTableBPublic" }, { "Ref": "RouteTableBPrivate" } ], "ServiceName": { "Fn::Join": [ "", [ "com.amazonaws.", { "Ref": "AWS::Region" }, ".s3" ] ] }, "VpcId": { "Ref": "VPC" } } } |
First there is the policy document, which I can use to limit who can access the VPC Endpoint, what resources they can talk to, and what actions they can perform. I’ve chosen to create an allow all policy document. I already have bucket policies to limit who can do what to my buckets. This is much like the decision I made earlier to allow all in my NACLs and enforce security in my security groups. And like NACLs, I may revisit this policy later for defense in depth, but it simplifies troubleshooting during initial setup to not go too deep. And in this case, I’d just be securing my buckets from myself. The bucket policy secures them from anywhere. So I’m not sure I get what the point of this policy is yet.
Next I reference my four route tables. CloudFormation will add a route for S3 to each one of them during provisioning. Since I’m in my VPC template, the VpcId is also just a reference.
And finally, I specify the service name for the endpoint, which in my case is com.amazonaws.us-east-1.s3. But I don’t want to hard code the region, so I use the intrinsic function Fn::Join and the pseudo parameter AWS::Region to construct the service name.
And that’s it for creating a VPC Endpoint, so let’s provision this thing and see it in action.
Workflow for Updating a Previously Deployed Stack
I was a little nervous about how well updating this stack would work. I have a VPC provisioned, and I’ve already provisioned a couple of other stacks on top of it (my Bastion and NAT). How well does updating the VPC work under these conditions? The answer is, pretty darned well.
Drift Detection
The first thing you should do before updating a stack is drift protection. Go to CloudFormation in the console, select your stack, and choose detect drift:

Then choose view drift results:

And you get something that looks like:
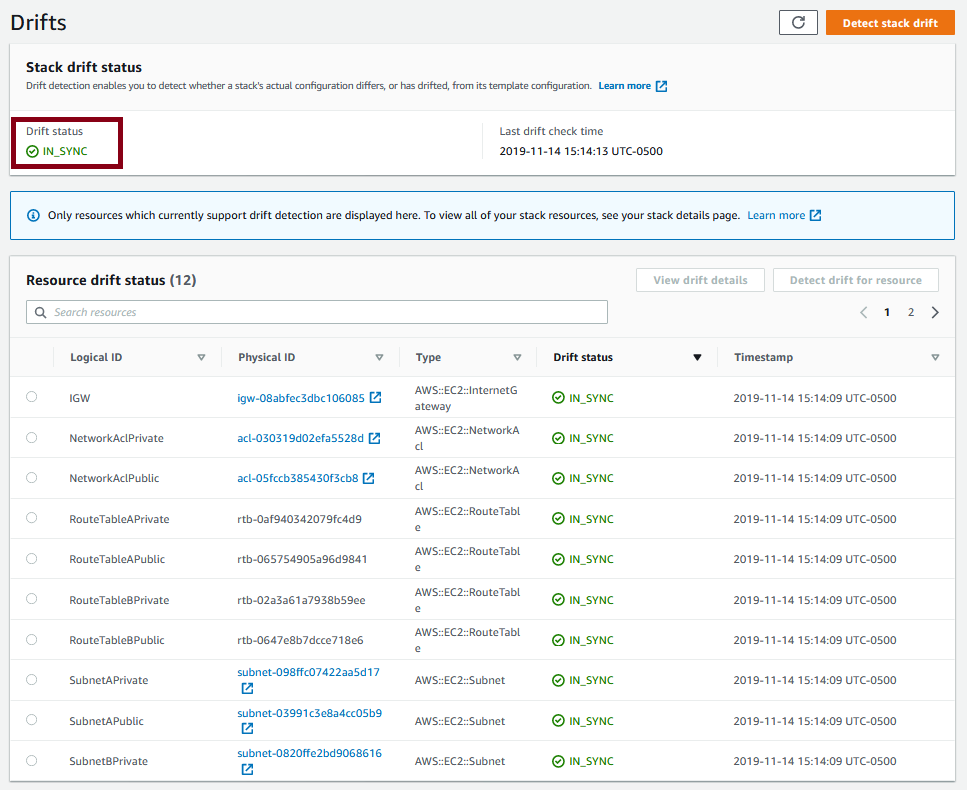
The highlighted drift status tells me that there is no drift detected. So what is drift? It’s changes to CloudFormation resources made outside of CloudFormation, like in the console or with the CLI. In general, you shouldn’t be making such changes. Change the template and update the stack if you need to reconfigure something. But note the info message that says “Only resources which currently support drift detection are displayed here.”. There is a learn more link where they list which resources are supported for drift detection.
If you follow that link, you’ll see that AWS::EC2::RouteTable is supported by drift detection. But if you read my last post for provisioning a NAT instance, it’s bootstrap ran a script that added or modified the default route for each of my private networks. And yet the route tables show as in sync. Why? Because route table is listed as a supported resources, but the routes themselves are not.
So it’s more accurate to say: make as few changes as possible to CloudFormation resources in the console or with the CLI. Sometimes you want to configure some stuff based on logic not readily available to you in CloudFormation. And you can often handle this with a little script in your bootstrap. But ideally, don’t make any changes that will show up as drift.
Now, what does it look like when drift is detected? Here is an example:
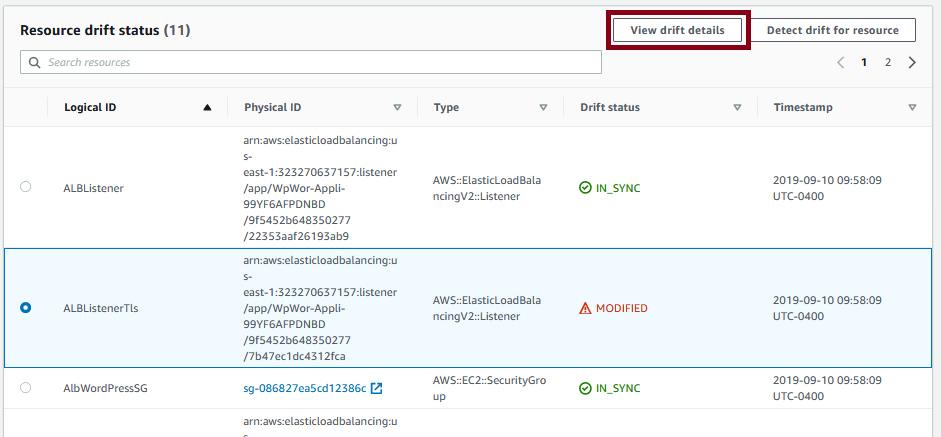
This is from my WordPress stack, which I’ll cover in my next couple of posts. But one of the resources, an application load balancer listener, is showing drift. As much as possible, you should remove this drift using the console, update your template with the additional configuration, and update your stack. And AWS couldn’t make this much simpler. With the drift selected, click on the view drift details button and you’ll get something that looks like this:
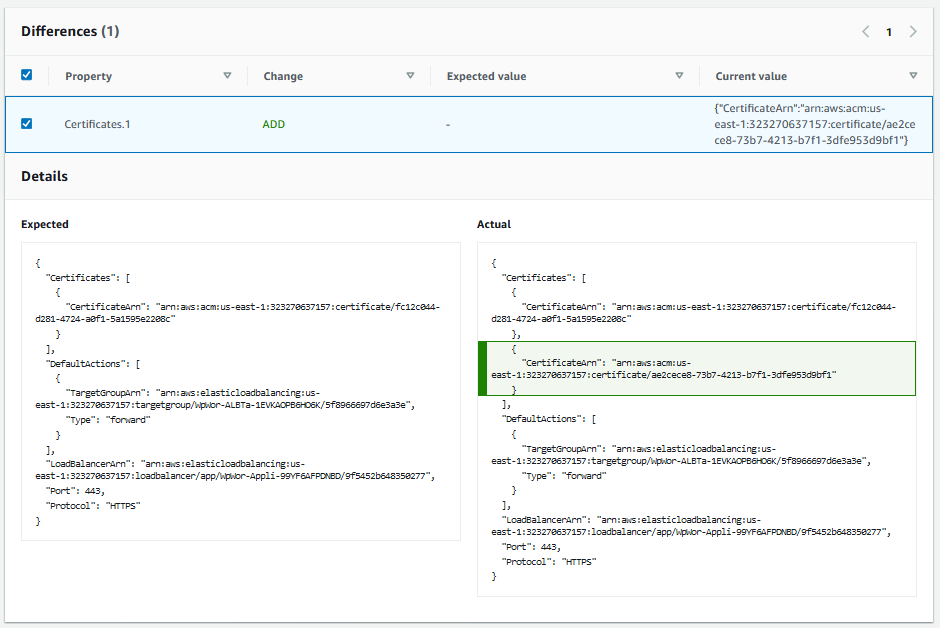
It shows you side by side, what it expected to see and what it sees, in CloudFormation template syntax. And click the check box next to individual differences, and it will highlight the difference in the actual view. That’s pretty much the change you should make in your CloudFormation template. Although you may need to add a parameter to avoid hard coding something in your template that shouldn’t be.
In this case, my WordPress uses SSL, so it takes as a parameter the certificate ARN to use for SSL. However, I actually have multiple WordPress installs with more than one domain name, so I have two certificates, but my template currently only allows me to specify one. I should go back and find a way to take a list of certificates as a parameter and configure them all through CloudFormation, or at least add a parameter for an alternate certificate. Then delete the drift configuration in the console and update the stack to get everything in sync again.
The point is that you should eradicate drift if you can before you update a stack, or at least minimize it. Otherwise, theoretically, your drift could cause the update to fail. It could even theoretically cause a delete to fail. I haven’t ever seen either of those cases in reality. I’ve been ignoring this one little drift for a while, and updates work just fine. But no donut for me, that’s very undisciplined.
Creating a Change Set
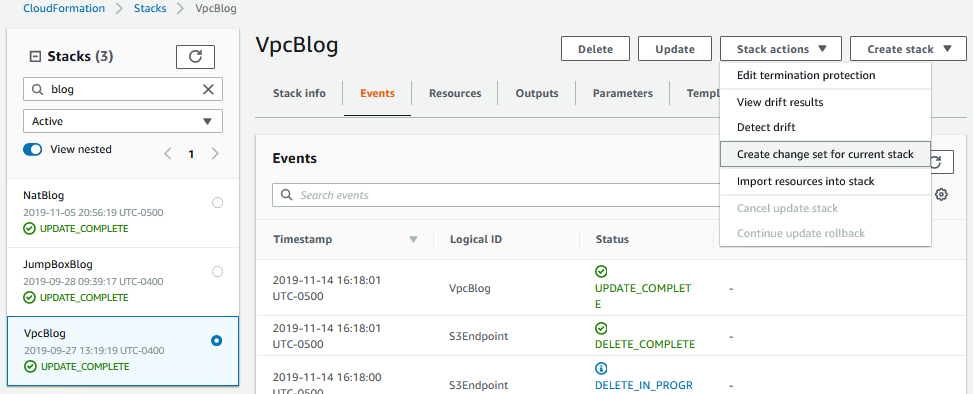
So, we’ve updated our template and done due diligence with drift detection. Now what? There are a couple of ways to update a stack through the console. I prefer to make a change set. So with the stack selected, choose create change set for the current stack:
Choose “Replace template”, “Upload template file”, and click “Choose file”. Navigate to your updated template, select it, and choose next:
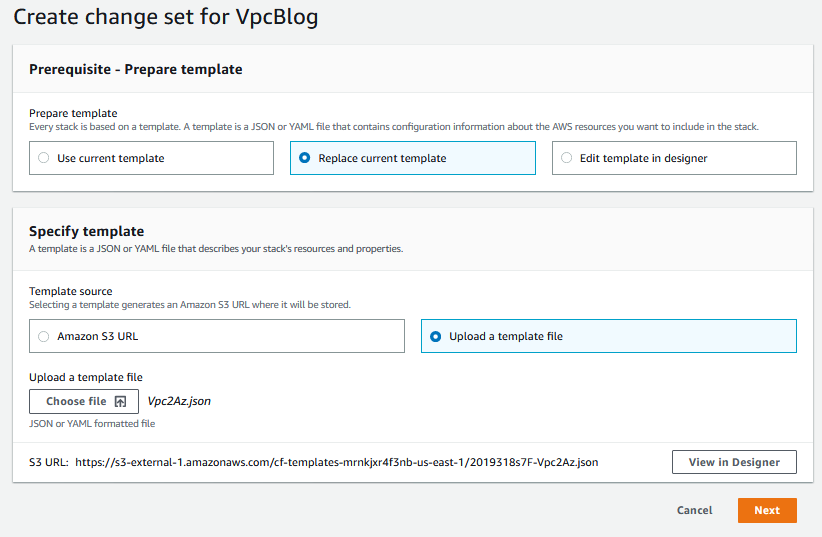
Now it’s going to take us through all the same pages we saw when we created the stack, but we’re not changing anything but the template at the moment, so hit Next -> Next -> Create Stack -> Create Stack (however many Nexts and Create Stacks there are), and you’ll land here:
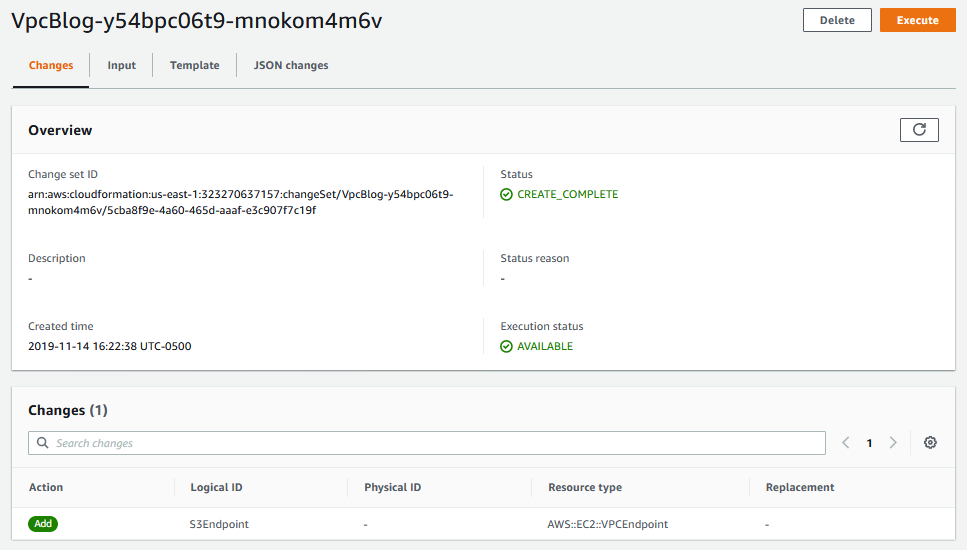
The status starts off as pending. Hit refresh and it will eventually change to in progress, and then create complete. You can see a list of individual changes it detected in the list at the bottom. In this case, it just shows one resource added, our VPC Endpoint, which is what we’d expect to see.
Executing the Change Set
Staying on the change set page, click the execute button, which takes us back to stack details:

Hit the refresh button every few seconds and you’ll see new event messages come in. Keep hitting it until the stack status is UPDATE_COMPLETE. And voila, which is French for you are now the proud father of a VPC Endpoint (err…or something like that).
Testing your VPC Endpoint
So how to tell if it’s working? Actually, it’s pretty easy. Of course you can check the route tables. And you should check the route tables too, before you try to see if it’s working. For whatever reason, when I add/remove route tables from the VPC Endpoint, it takes several minutes for the route table to get updated, and there isn’t any point in testing it until the route shows up.
But once the route is in place, to see it in action, spin up a new temporary box on one of the private subnets. Also spin up your Bastion if it’s not already up. Now, SSH into your Bastion Host, and then to your private box. From there, do a sudo su, and then run the following command:

And we’re there in one hop. No gateways, no routers, it’s like magic. Compare that to a traceroute to the Internet:
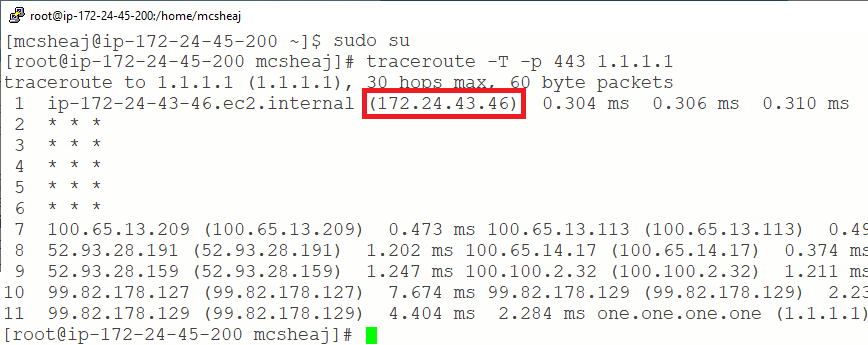
It goes through our NAT (the highlighted address), and through a few routers before landing on our destination. QED.
Still not convinced? Shut down your NAT, and try those tests again. But remember, the NAT is in a auto scaling group, so to shut it down go to the auto scaling group and set the min and desired instances to 0. Once it’s down, the traceroute to S3 should work the same. The traceroute to 1.1.1.1 shouldn’t work at all.
Sum Up
That’s about it for VPC Endpoints to S3. Just remember that using them improves performance and cuts down on transfer costs. Some of the stuff I’ve seen/heard has also sold them as more secure. I suppose that’s true; there can’t be a man in the middle if there is no middle. But I would argue it’s pretty negligible. Connecting to the public endpoint of S3 using TLS is still pretty well secure. At least I hope so 😉
I expected this to be a short post, but then I had to go and talk about drift detection, and change sets, etc. Oh well. Anyway, we’re now ready to deploy some WordPress, or at least the database components for WordPress, which I’ll do in my next post.
