
In this post we’re going to talk about how to provision a NAT (Network Address Translation) Instance from scratch, using AWS Linux 2 and CloudFormation. We’re going to provision an auto-healing NAT, meaning an instance launched by an auto-scaling group with a desired capacity of 1, so if our instance crashes the auto-scaling group with terminate it for us and spin up a new one. This is much like the auto-healing Bastion Host I provisioned in a previous post, Provision a Bastion Host to our VPC with CloudFormation. So the CloudFormation template for this NAT Instance is very similar to the Bastion Host template, and this post will focus only on the differences.
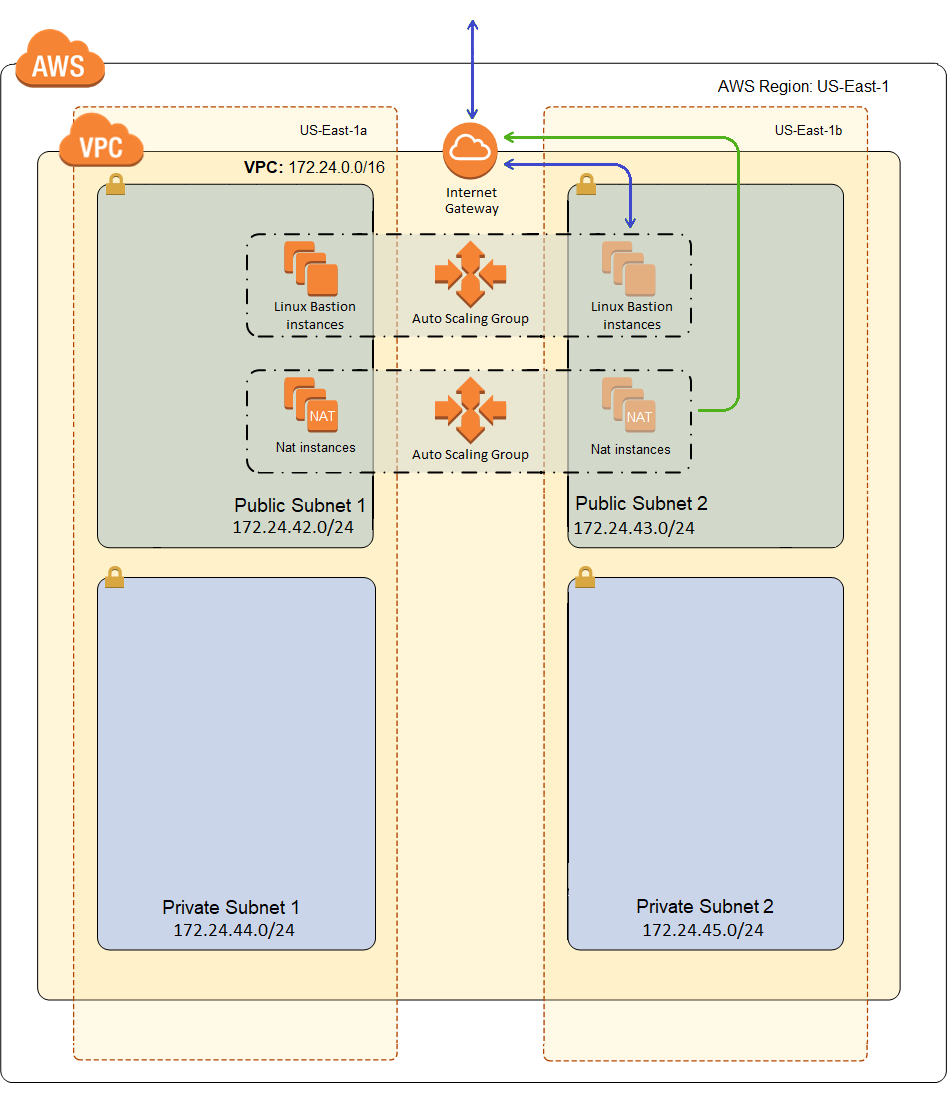
Here is what our VPC will look like after deployment:
Why a NAT Instance?
AWS has this highly available, auto-scaled, thing called a NAT Gateway, so why aren’t I using it? First of all, cost is a problem for me. I’ve set a budget of $400 a year, which I know is pretty low and colors many of my decisions along the way. The image below is from Cost Explorer, on a VPC that I create using one of the samples you can get from Amazon, with a Bastion Host, a NAT Gateway in each availability zone, and an auto-scaling WordPress (all built from sample CloudFormation templates).
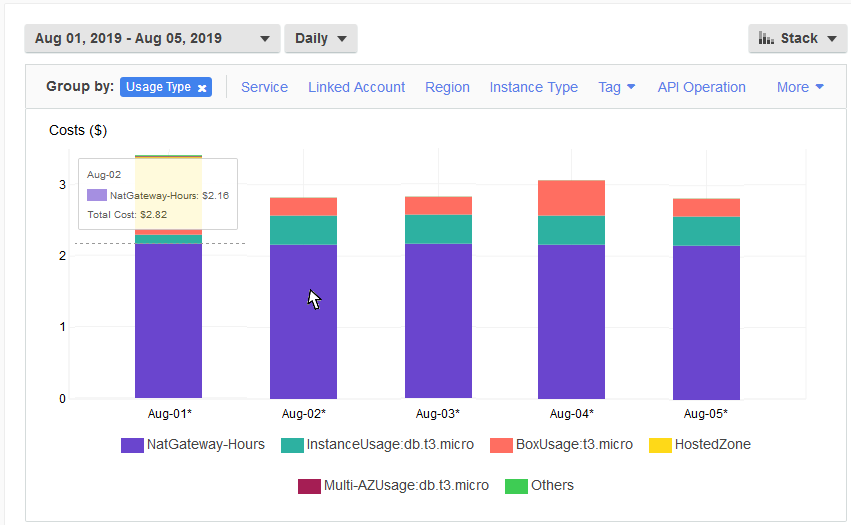
And already, that’s not going to work. Running two NAT Gateways 24/7 is going to cost me $2.16 per day, or about $788.40 per year, or almost twice my entire budget. And NAT isn’t that important to me. It’s not part of my workload at all, as in my WordPress servers are generally not going to be proxying content from the Internet. It’s only purpose is so I can patch my WordPress servers maybe once a month. It’s definitely not worth 75% of my total cost, as it is in the picture above.
While I said a NAT isn’t that important to me, it is still critical that I have one for reasons I’ll explain a bit later, but it’s still not worth tripling my budget to have an auto scaling NAT in each AZ. My one little NAT instance on a t3.nano gets the job done just fine at about a 94% savings.
Now I’ve seen many forums where people argue about how useful NAT gateways are. And its usually, pretty obviously, between small business to student/hobbyist types and big enterprise types. And on the non-enterprise side, people say stuff like NAT Gateways are highway robbery, etc. I don’t fall into that crowd. I’m a consultant and I work on those large enterprises in my day job. And in those environments, $788.40 may be just noise. But this is for my small company, my web site really isn’t expected to drive business, and so its hard to justify the cost of NAT gateways.
Another thing is that a NAT Gateway requires an Elastic IP address, and AWS best practices say I need one per availability zone. Same for their best practices for Bastion Hosts, one per availability zone and use an Elastic IP address. Even for my little network, that’s 4 Elastic IP addresses in use already, and the soft limit for a region is 5. That seems a bit incongruous. And besides, I really have to question where some of these best practices come from. For instance, NAT Gateway doesn’t even support port forwarding. Meaning nobody is going to be connecting to it’s public address. So why does it need an Elastic IP address?
It’s a soft limit, so I know I can request an increase. But I’m a small startup, and it feels like they politely say no a lot when I ask them to increase limits. So for now, I’m going to reject any “best practice” that includes throwing around Elastic IPs like they are candy. I can lookup the address of my Bastion Host when I need it, thank you very much!
And finally, why roll my own? There are plenty of NAT Instance AMIs out there that I can download and use for free. But again, they’re dated, so for instance there are not any for ASW Linux 2, and support for the original AWS Linux is fast drawing to a close. Somehow I don’t think Amazon is going to create any more NAT instance AMIs now that they’ve rolled out NAT Gateways. And last but not least, while I didn’t know how to do it when I set out, I was pretty sure it wasn’t that hard to configure a Linux box as a NAT gateway, so let’s give it a whirl.
The NAT Instance CloudFormation Template
As previously mentioned, the template for this is very similar to the Bastion Host template from my previous host. In fact, the IAM profile, auto-scaling group, and launch configuration are virtually identical (except some minor name changes, like BastionProfile => NATProilfe), so I’m not going to dig into them again. The two substantial differences in the template are the security group and instance role, so we’ll talk about them now.
The Security Group
Here is the security gorup:
1 2 3 4 5 6 7 8 9 10 11 12 13 14 15 16 17 18 19 20 21 22 23 24 25 26 27 28 29 30 31 32 33 34 35 36 37 38 39 40 41 42 43 44 45 46 47 48 49 50 51 52 53 54 55 56 57 58 59 60 61 62 63 64 65 66 67 68 69 70 71 72 73 74 75 76 77 | "NatSecurityGroup": { "Condition": "CreateSecurityGroup", "Type": "AWS::EC2::SecurityGroup", "Properties": { "GroupDescription": "Allow web traffic for updates through NAT, and SSH from local addresses.", "VpcId": { "Ref": "VpcId" }, "SecurityGroupIngress": [{ "IpProtocol": "tcp", "FromPort": 22, "ToPort": 22, "CidrIp": { "Ref": "VpcCidr" } }, { "IpProtocol": "tcp", "FromPort": 80, "ToPort": 80, "CidrIp": { "Ref": "VpcCidr" } }, { "IpProtocol": "tcp", "FromPort": 443, "ToPort": 443, "CidrIp": { "Ref": "VpcCidr" } }, { "IpProtocol": "icmp", "FromPort": -1, "ToPort": -1, "CidrIp": { "Ref": "VpcCidr" } } ], "SecurityGroupEgress": [{ "IpProtocol": "tcp", "FromPort": 80, "ToPort": 80, "CidrIp": "0.0.0.0/0" }, { "IpProtocol": "tcp", "FromPort": 443, "ToPort": 443, "CidrIp": "0.0.0.0/0" }, { "IpProtocol": "icmp", "FromPort": -1, "ToPort": -1, "CidrIp": "0.0.0.0/0" } ], "Tags": [{ "Key": "Name", "Value": "NatSG" }, { "Key": "StackName", "Value": { "Fn::Sub": "${AWS::StackName}" } }, { "Key": "Network", "Value": "Public" } ] } } |
The ingress rules allow SSH, HTTP/HTTPS, and all ICMP. All of the ingress rules are constrained to only IP address within my VPC CIDR. The SSH is to allow access from the JumpBox. The web traffic is to allow internal servers to pass through traffic to yum repositories using NAT, for updates. And the ICMP is to allow stuff like ping and traceroute (with -I) to work. Without these utilities, it’s can be difficult to convince yourself that the NAT is working at all.
Note that earlier I said that NAT wasn’t even part of my production payload, and that’s true, but it is still critical. Every time an auto-scaling event occurs that results in a new instance spinning up, that instance will need to do install/update packages or it’s bootstrap script will fail, and the box will never fulfill it’s intended purpose. So unlike the Bastion Host, I can’t power the NAT down and only power it up when updates are happening, because I won’t necessarily know when updates are happening. I may very well be asleep at the time.
As for the egress rules, I’m just letting out the web traffic and again all ICMP. This allows for local yum updates as well as pass through yum updates from instances on my private networks using NAT.
The IAM Role and Policies
The IAM policy is mostly the same as that for the Bastion Host. Here is the policy, with the differences highlighted:
1 2 3 4 5 6 7 8 9 10 11 12 13 14 15 16 17 18 19 20 21 22 23 24 25 26 27 28 29 30 31 32 33 34 35 36 37 38 39 40 41 42 43 44 45 46 47 48 49 50 51 52 53 54 55 56 57 58 59 60 61 62 63 64 65 66 67 68 69 70 71 72 73 74 75 76 77 78 79 80 81 82 83 84 85 86 87 88 89 | "NatRole": { "Condition": "CreateIAMRole", "Type": "AWS::IAM::Role", "Properties": { "AssumeRolePolicyDocument": { "Version": "2012-10-17", "Statement": [{ "Effect": "Allow", "Action": "sts:AssumeRole", "Principal": { "Service": "ec2.amazonaws.com" } }] }, "Path": "/", "Policies": [{ "PolicyName": "IP_Bastion_Iam", "PolicyDocument": { "Version": "2012-10-17", "Statement": [{ "Action": "iam:ListUsers", "Resource": "*", "Effect": "Allow" }, { "Action": [ "iam:ListSSHPublicKeys", "iam:GetSSHPublicKey" ], "Resource": { "Fn::Sub": "arn:aws:iam::${AWS::AccountId}:user/*" }, "Effect": "Allow" }, { "Action": "iam:GetGroup", "Resource": "*", "Effect": "Allow" } ] } }, { "PolicyName": "IP_Bastion_Ec2", "PolicyDocument": { "Version": "2012-10-17", "Statement": [{ "Action": [ "ec2:DescribeTags", "ec2:ModifyInstanceAttribute", "ec2:DescribeRouteTables" ], "Resource": "*", "Effect": "Allow" }, { "Condition": { "StringEquals": { "ec2:ResourceTag/StackName": { "Fn::Sub": "${AWS::StackName}" } } }, "Action": [ "ec2:CreateTags" ], "Resource": "*", "Effect": "Allow" }, { "Effect": "Allow", "Action": [ "ec2:CreateRoute", "ec2:DeleteRoute", "ec2:ReplaceRoute" ], "Resource": "*", "Condition": { "StringEquals": { "ec2:ResourceTag/Network": "Private" } } } ] } } ] } } |
The first change is that I allow the action ec2:ModifyInstanceAttribute. I do this because for a NAT instance, I need to turn off the instance property that enables Source/Dest checking. What is this? Normally, an EC2 instance (or more precisely a network interface) will only accept traffic where either the source IP address or the destination IP address is our IP address (i.e. the IP address assigned to the network interface). But as a NAT instance, I want to accept and masquerade traffic from other private IP addresses to the Internet. For that to work, Source/Dest checking must be disabled, and to configure that I need permission for the action ec2:ModifyInstanceAttribute. And I haven’t found a way to configure this in the CloudFormation template, so for now I’ll do it using the CLI in the bootstrap script.
Next, I’m going to need to read and modify route tables. To read them I need ec2:DescribeRouteTables. Then I also need to create, update, and delete routes. I only need these actions on private networks, so I constrain these policies based on a tag. I didn’t constrain ec2:DescribeRouteTables based on the tag, because I can’t. In general, read actions in IAM rules don’t support a lot of conditional constraints.
The NAT Instance Bootstrap
In general, like the templates, the bootstrap code for all of my instances is going to have a fair amount of duplication. The general form will be:
- Initialize some variables from metadata.
- Create user accounts for administrators
- Install jq
- Update the motd banner
- Update the instance name to include the stack name
- Install the Fedora epel yum repository
- Install and enable iptables-service and fail2ban from the epel reposoitory
- <<< DO SOME INSTANCE SPECIFIC STUFF >>>
- Do yum -i update
- Run the cfn-init helper
- Run the cfn-signal helper to signal the auto-scaling group that we’re done
In this, and subsequent posts, I’m only going to describe step 8. If you don’t understand some of the other stuff in the bootstrap, have a look at the previous blog posts in this series. And I should probably refactor this stuff so a have a bootstrap_stage1.sh and a bootstrap_stage3.sh and my bootstrap becomes:
- Call bootstrap_stage1.sh
- <<< DO SOME INSTANCE SPECIFIC STUFF >>>
- Call bootstrap_stage3.sh
That would be a bit better than copying and pasting that common code to multiple bootstrap scripts. Maybe someday I’ll even do it. Now let’s talk about that <<< DO SOME INSTANCE SPECIFIC STUFF >>> with regards to my NAT instance boot strap.
Disable Source and Destination Check
Now its time to disable Source/Dest checking for our NIC card. That’s done using the CLI like so:
1 2 | # Disable source/destination IP check so forwarding will work aws ec2 modify-instance-attribute --instance-id ${INSTANCE_ID} --source-dest-check "{\"Value\": false}" --region ${REGION} |
This is the equivalent of configuring it in the AWS console, like so:

This works from our EC2 instance because we gave it permission for the ec2:ModifyInstanceAttribute action through the instance profile earlier.
Turn on IPV4 Forwarding
Next we need to enable our machine to act as a router. We need to do this to allow pass through traffic from our private networks to the Internet with Network Address Translation. To do this, we need to configure one line in /etc/sysctl.conf and tell sysctl to reread its configuration:
1 2 3 | # Turn on IPV4 forwarding echo "net.ipv4.ip_forward = 1" >> /etc/sysctl.conf sysctl -p |
The system reads /etc/sysctl.conf on boot, so this is persistent.
Configure iptables
Now we need to configure iptables, like so:
1 2 3 4 5 6 7 8 9 10 11 12 13 14 15 16 17 18 19 20 21 22 23 24 25 | # Get the VPC CIDR from metadata MAC_ADDRESS=$(curl http://169.254.169.254/latest/meta-data/network/interfaces/macs/) VPC_CIDR=$(curl http://169.254.169.254/latest/meta-data/network/interfaces/macs/${MAC_ADDRESS}/vpc-ipv4-cidr-block) # Enable nat in iptables for our VPC CIDDR iptables -t nat -A POSTROUTING -o eth0 -s ${VPC_CIDR} -j MASQUERADE # Configure iptables: # 1. accept anything on the loopback adapter # 2. accept incoming packets that belong to a connection that has already been established (using the state module) # 3. accept udp on ports 67:68 (DHCP, only from our CIDR) # 3. accept tcp on port 22 (SSH, only from our CIDR) # 4. accept tcp on port 80 (yum, only from our CIDR) # 5. accept tcp on port 443 (yum, only from our CIDR) # 4. drop anything else iptables -A INPUT -i lo -j ACCEPT iptables -A INPUT -m state --state RELATED,ESTABLISHED -j ACCEPT iptables -A INPUT -p udp --dport 67:68 --sport 67:68 -s ${VPC_CIDR} -j ACCEPT iptables -A INPUT -p tcp -m tcp --dport 22 -s ${VPC_CIDR} -j ACCEPT iptables -A INPUT -p tcp -m tcp --dport 80 -s ${VPC_CIDR} -j ACCEPT iptables -A INPUT -p tcp -m tcp --dport 443 -s ${VPC_CIDR} -j ACCEPT iptables -A INPUT -j DROP # And persist the iptables config iptables-save > /etc/sysconfig/iptables |
The first highlighted line is where the magic happens to make iptables act as a NAT. This line says for addresses in the VPC CIDR range, iptables should masquerade in the POSTROUTING chain. So a private network instance tries to connection to the Internet, but it’s routed to our NAT. iptables will then convert the address to it’s own address. Of course, this is a private address too, but when it gets to the Internet Gateway, it will be converted to the NAT’s public IP address, which makes the response Internet routable. When the response comes, the address is translated back. i.e. the Internet Gateway translates it back to the private address of the NAT, and then the NAT translates it back to the private IP of the origin server.
The other highlighted section is just the rules for what we will allow into this server. Again, we allow any related or established, so this machine can connect to anyone and the return traffic will pass. Then we allow inbound DHCP, SSH, and web traffic, but only when the source address matches our VPC CIDR. Drop anything else, and persist the rules.
Download and Run the Script to Configure Route Tables
The next little code block downloads a script called aws-auto-healing-nat.sh and runs it. I’ll talk about that script in detail below.
1 2 3 4 5 | # Download the script to update the default routes on the private networks and run it wget --no-cache https://raw.githubusercontent.com/mcsheaj/wordpress-high-availability-blog/master/scripts/aws-auto-healing-nat.sh mv aws-auto-healing-nat.sh /sbin chmod 700 /sbin/aws-auto-healing-nat.sh /sbin/aws-auto-healing-nat.sh |
Configure the Route Table Script to Run on Startup
I also want aws-auto-healing-nat.sh to run again on reboot, so I append a line to /etc/rc.d/rc.local, like so:
1 2 3 | # Reset the private route tables on boot echo "/sbin/aws-auto-healing-nat.sh" >> /etc/rc.d/rc.local chmod 700 /etc/rc.d/rc.local |
NAT Instance: The Route Table Script
I did not write this script. I found it on the blog post: AWS Auto-healing VPC NAT Instance by Shing Chen. I did have to modify it some, and I chose to modify it more, so if it works all credit goes to Shing Chen, if not the blame is entirely my own.
This code just loops though all route tables that match a given tag. The tag key is Network and the value it’s looking or is Private (or at least that’s the default, it can be overridden with arguments). If there is no default route, it creates one pointing at the NAT. If there is a route, but it is not currently pointing to the NAT, it updates it to point at the NAT. Here is the script:
1 2 3 4 5 6 7 8 9 10 11 12 13 14 15 16 17 18 19 20 21 22 23 24 25 26 27 28 29 30 31 32 33 34 35 36 37 38 39 40 41 42 43 44 45 46 47 48 49 50 51 52 53 54 55 56 57 58 59 60 | #!/bin/bash # This script is to set a default route for route tables that need NAT in the same VPC. MAC_ADDRESS=$(curl http://169.254.169.254/latest/meta-data/network/interfaces/macs/) VPC_ID=$(curl http://169.254.169.254/latest/meta-data/network/interfaces/macs/${MAC_ADDRESS}/vpc-id) INSTANCE_ID=$(curl http://169.254.169.254/latest/meta-data/instance-id) REGION=$(curl http://169.254.169.254/latest/dynamic/instance-identity/document | jq -r .region) TAG_KEY="Network" TAG_VALUE="Private" # Print help function usage() { echo "" echo "${0} [options]" echo " --tag-key - route table tag key to indicate if it is a private subnet (default: ${TAG_KEY})" echo " --tag-value - route table tag value to indicate if it is a private subnet (default: ${TAG_VALUE})" echo "" } # Get options while [ "${1}" != "" ]; do case ${1} in --tag-key) shift ${TAG_KEY}=$1 ;; --tag-value) shift ${TAG_VALUE}=$1 ;; *) usage exit ;; esac shift done # Determine route tables that need to use NAT for the same VPC ROUTE_TABLES=$(aws ec2 describe-route-tables --filters "Name=vpc-id,Values=${VPC_ID}" "Name=tag:${TAG_KEY},Values=${TAG_VALUE}" --region ${REGION} --output json | jq .RouteTables[].RouteTableId -r) # For each route table in route tables for ROUTE_TABLE in ${ROUTE_TABLES} do # Get the instance IDs of the default router on each private subnet TARGET=$(aws ec2 describe-route-tables --filters "Name=route-table-id,Values=${ROUTE_TABLE}" --region ${REGION} --output json | jq '.RouteTables[].Routes[] | select(.DestinationCidrBlock == "0.0.0.0/0")' | jq .InstanceId -r) echo "Checking ${ROUTE_TABLE}" if [ "${TARGET}" = "" ]; then # if there is no default router # Create default route echo "No default route is detected. Creating default route for ${ROUTE_TABLE}" aws ec2 create-route --route-table-id ${ROUTE_TABLE} --destination-cidr-block 0.0.0.0/0 --instance-id ${INSTANCE_ID} --region ${REGION} elif [ "${TARGET}" != "${INSTANCE_ID}" ]; then # if the default router is not me # Replace default route echo "Default route is set to ${TARGET}. Replacing default route to ${INSTANCE_ID}" aws ec2 replace-route --route-table-id ${ROUTE_TABLE} --destination-cidr-block 0.0.0.0/0 --instance-id ${INSTANCE_ID} --region ${REGION} else # if this instance is already the default router echo "No change is required" fi done |
The one line in the original script that I had to change was this one:
1 | ROUTE_TABLES=`aws ec2 describe-route-tables --filters "Name=tag:$TAG_KEY,Values=$TAG_VALUE" --region $REGION --output text | grep ROUTETABLES | grep $VPC_ID | awk '{print $2}'` |
This line is using describe-route-tables with a filter for the tag and an output type of text. It then parses the text with a combination of grep and awk to get back just the route table id. I had to change awk ‘{print $2}’ to awk ‘{print $3}’, and then it worked for me. Why was this change necessary? Because the original blog post is from 2015, and sometime between then and now, some AWS developer decided that the route table id should be in a different position in the text output for whatever reason.
But if you look at my script, I changed that line quite a bit:
1 | ROUTE_TABLES=$(aws ec2 describe-route-tables --filters "Name=vpc-id,Values=${VPC_ID}" "Name=tag:${TAG_KEY},Values=${TAG_VALUE}" --region ${REGION} --output json | jq .RouteTables[].RouteTableId -r) |
First, I changed the output format to JSON. This should make me less vulnerable to the whims of future AWS developers. While they might change the JSON, they will probably do so by adding to it, so the property I want will be the same. I also added a filter to only get routes from my VPC_ID back. The original code used grep for that, but since my output is now JSON and not line oriented, grep won’t do it for me. Finally, I pipe it to jq to parse the JSON and return the raw route table id.
There were also a few other places where the original script was parsing text output using grep and awk. I changed all of those to use JSON and jq. Again, this just makes me less vulnerable to future changes to the CLI.
Testing the NAT
In our current state, this may be difficult. I haven’t provisioned anything to my private subnets yet. But I can check the route tables for my private networks which should look something like this:
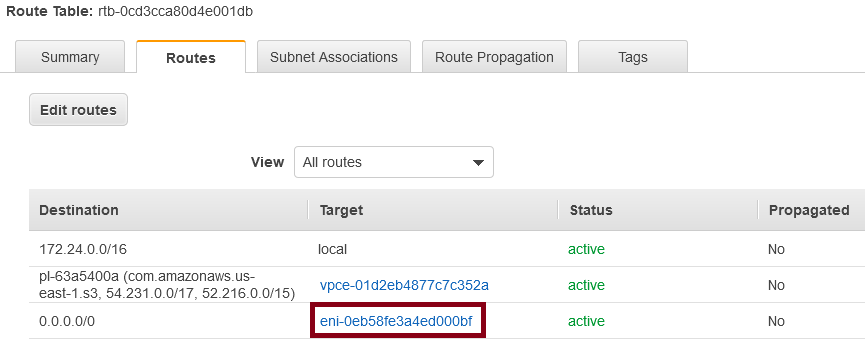
The default route should point to an Elastic Network Interface (ENI), like so:

Click on the instance id and you get:

If this is showing your NAT, then it’s configured correctly. Terminate your NAT and you’ll see that default route target changes to “blackhole” (meaning this route is the proverbial rode to nowhere). Wait a couple of minutes for the auto-scaling group to spin up a new NAT and you should see the ENI update in the default route.
If you’re the type that really needs to see it in action, just go to the AWS console and launch a temporary instance in one of the private subnets. Make sure that you assign a key pair for which you have the private key, and do not assign a public IP address to the instance. Then SSH into it (as in SSH into the Bastion and from there SSH into this VM, since this VM doesn’t have a public IP and can’t be reached from the Internet). Now let’s try to ping something, like 1.1.1.1:
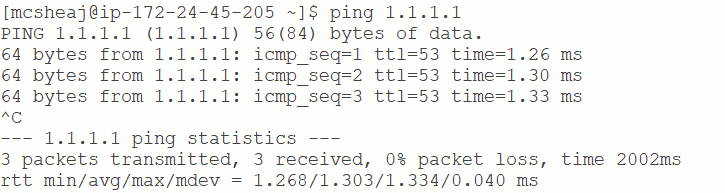
And look at that, it worked. Technically, if you followed my directions that really should be enough proof that it’s working. We don’t have a public IP address. How could we be successfully getting to the Internet without a NAT. Of course, you could power down the NAT and then see it stop working. But if you want more, try installing traceroute and then do this:
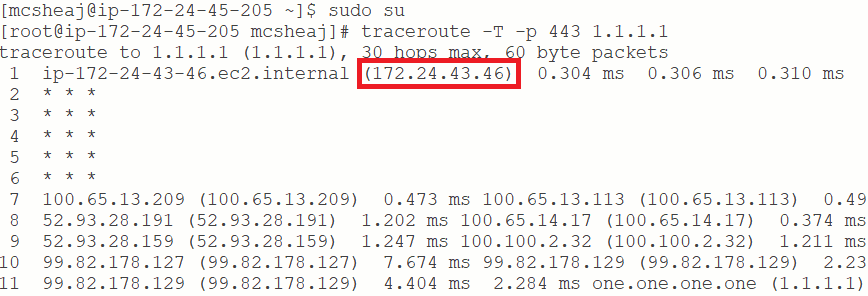
QED. The highlighted IP address is the address of my NAT.
Sum Up
So I’m now four posts in, and I haven’t quite gotten to doing anything WordPress related. And there is one more infrastructure thing I need to do before working on the WordPress stuff. I need to create a VPC gateway endpoint to allow connections from my VPC to S3 without going over the Internet. S3 is where I’m going to get my yum updates for AWS Linux 2. I’ll do a quick template change to deploy that VPC gateway endpoint in my next post, and then we’ll be ready to do some WordPress.
There is one improvement I’ve thought of for the script that updates the route tables. It works fine for an auto-healing NAT, but it precludes the possibility of horizontal scaling. If more than one NAT instance spins up, the last one to run this script will take over the routing for all subnets. Any previous NATs that are still up and running will now just be lame ducks. If I modified the script so I only replace an existing route if it is in the same availability zone as the NAT instance, or if the existing default route is a “blackhole” or missing, then horizontal scaling is possible. I can scale out to at least one instance per availability zone, and each will handle it’s own subnet NAT needs.
I should also setup a cron job to run this script periodically, say once every 15 minutes. That way if a new private subnet is added, or an existing NAT instance dies, any NAT that is still running will take over the NAT responsibilities for that availability zone until a NAT spins up within the availability zone.
I may make these changes in a future blog post, but for now an auto-healing NAT is fine for my needs. I don’t anticipate needing horizontally scaling NAT any time soon.
Reference
- Walkthrough setting up AWS NAT Instances: The multipurpose instance – Rakesh kanagaraj
- AWS Auto-healing VPC NAT Instance – Shing Chen